• Home
  • Handcrafted Cards
    • Challenge Cards
    • Quick Tips
  • About Me
  • Shop
  • More Creative Stuff
    • 3D Printing
    • Home Decor
    • Model Railroading
    • Preparedness
    • Sims 4 Builds
  • Recognition

Cricketleg Creative

“Beautiful Blossoms” Challenge

March 9, 2021 Challenge Cards, Handcrafted Cards

Look what’s blooming in the latest Simon Says Stamp challenge with “Beautiful Blossoms”!

beautiful blossoms challenge

Well, hi!

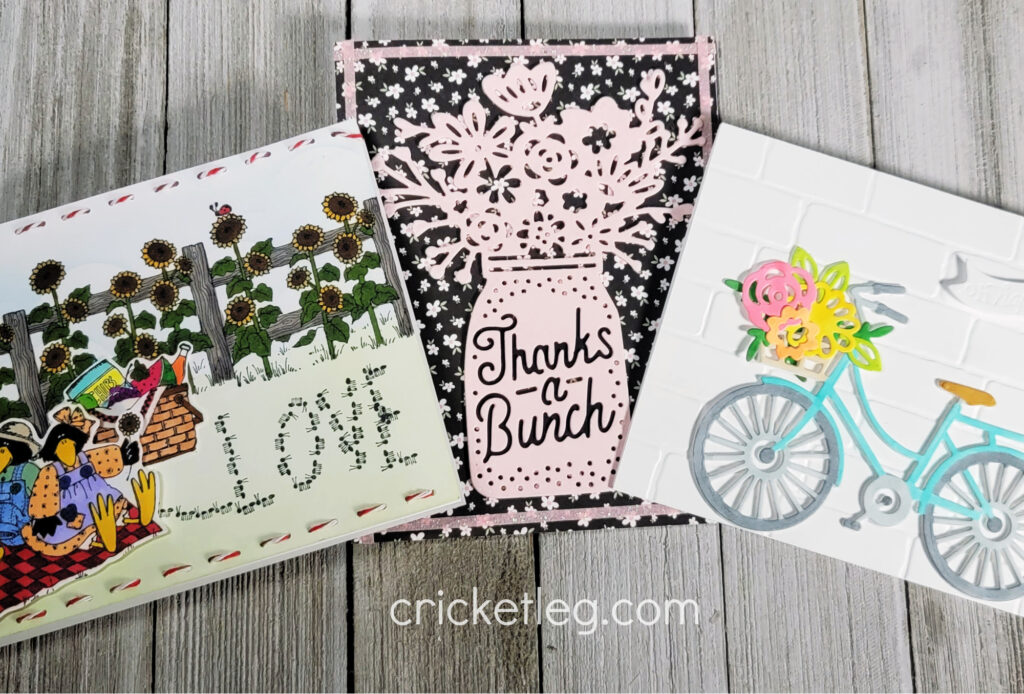
Spring is just around the corner (thank, goodness) so I’m grateful for some bright, floral fun with this “Beautiful Blossoms” card challenge. I used some new and some old to make three very different cards to enter the challenge.

Let’s take a closer look, shall we?
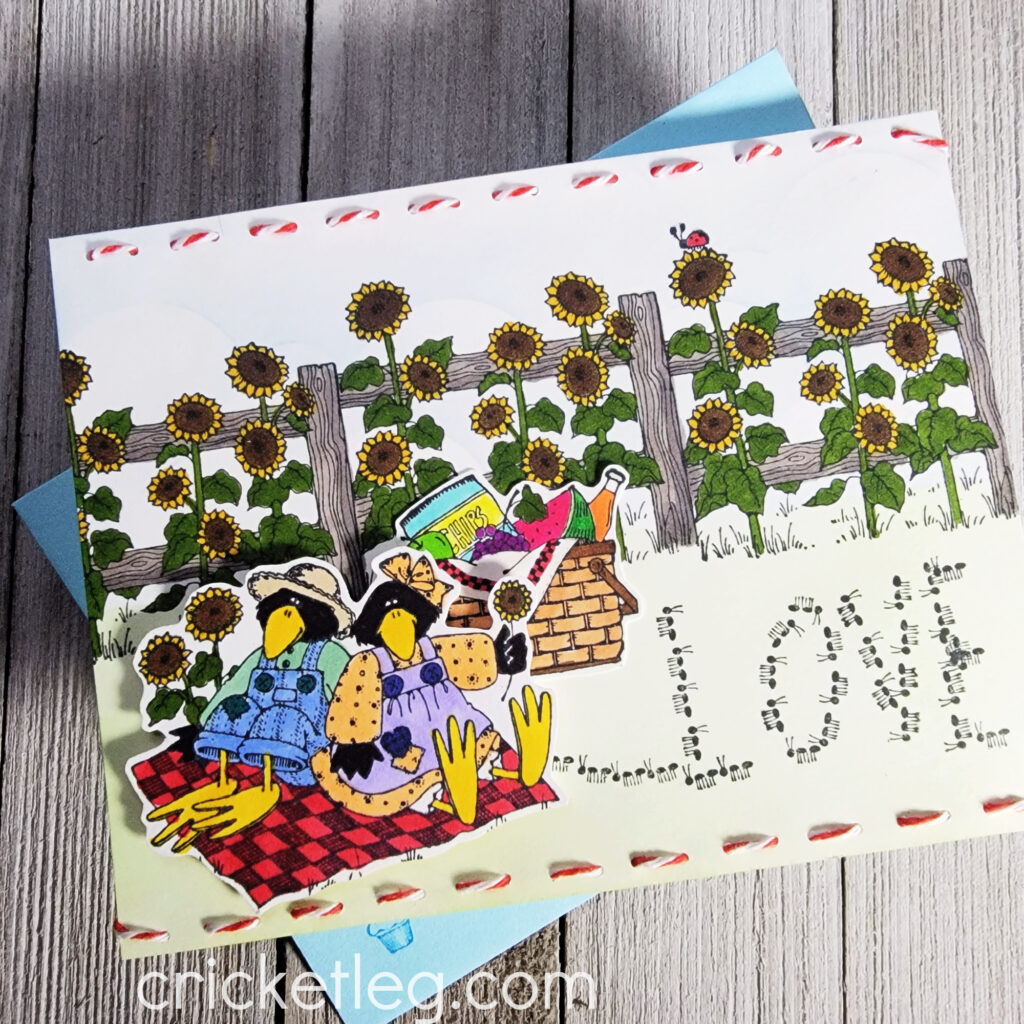
Crow Picnic Card

For this “Beautiful Blossoms” Challenge entry I dove into my old Stampin’ Up! stash of stamps for this crow and sunflower set. I remember making tons of cards using this set back in the day. But I always used colored pencils. Now that I have Copic markers I find I use them as much or even more than colored pencils!

This is an anniversary card for a family member so I decided to use the ant stamp to stamp the word “LOVE” in the grass. It’s a little wonky, but hey, they’re ants…they’re not perfect!

I also used some red and white baker’s twine to add some interest at the top and bottom.
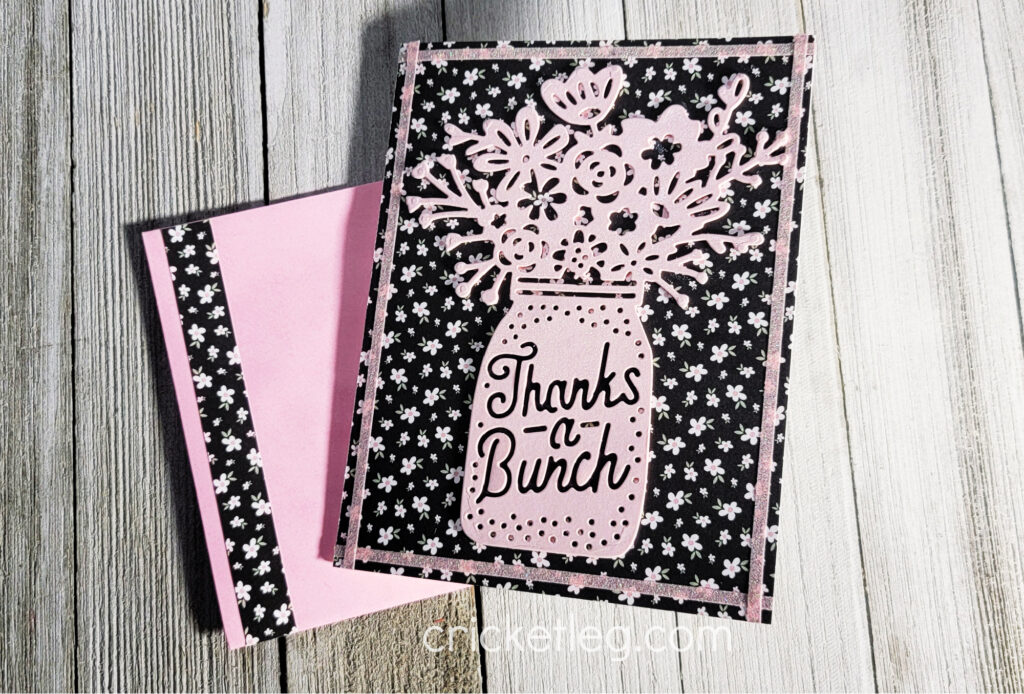
beautiful blossoms picnic card

Thanks a Bunch Card

While I do love stamping, sometimes I just want to crank out a card with only paper and no stamps. So I used this Sizzix die cut in pink (four layers) to create the main focus of the card.

The background paper is from a Simon Says Stamp card kit. I used my Spectrum Noir glitter brush to cover the entire front of the jar of flowers. You can’t see it in the picture, and no matter how I angled the camera I just couldn’t capture the shimmer. But it’s there! You can see how it looks on another one of my pink/black floral cards here.

I love pink and black together!
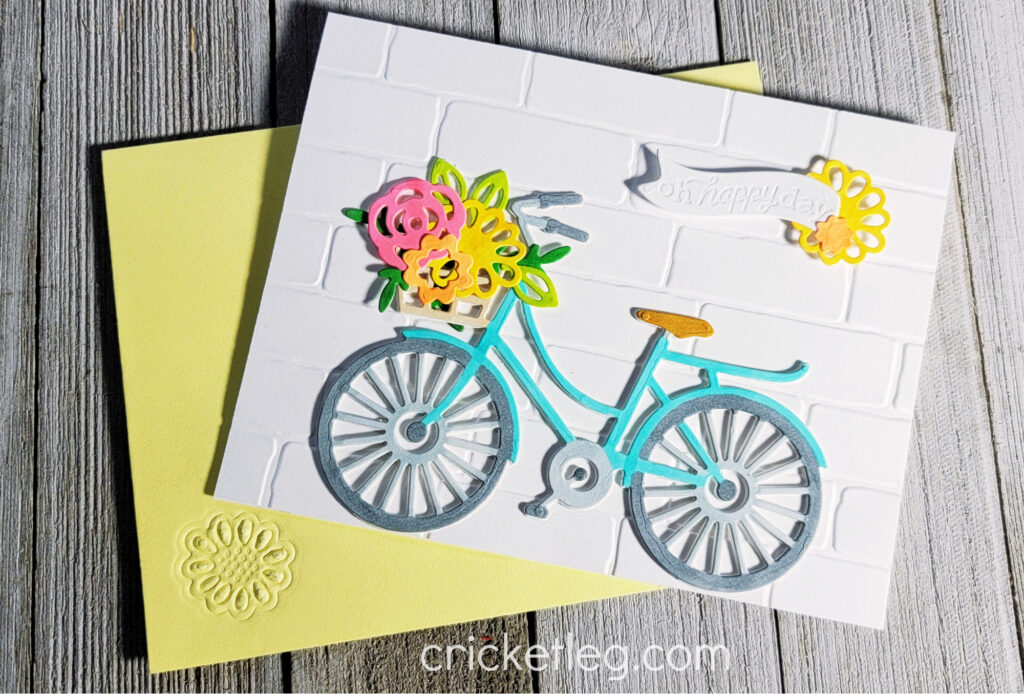
pink and black card

Floral Bike Card

I’ve been wanting to use this die set from Sizzix since my daughter gave it to me recently as a gift. (The floral jar in the Thanks a Bunch Card is also from her! Thanks, dear!) What is it about bikes and flowers?

Anyway, everything was die cut in white cardstock. The bike has four layers for dimension. I used Copic markers to color in the bike and flowers. The background is made using an embossing folder.

I used an embossing mat in my Big Shot to press a flower image onto the matching envelope. Loving the look of this clean and bright card!

floral bike card

Alright, spring. I’m ready. You can come now. I guess while I wait I’ll just have to hope that Simon Says Stamp will do more spring-y challenges!

Y’all take care!

Leave a Comment Categories: Challenge Cards, Handcrafted Cards
Share :

“Fun with Dies” Challenge

December 8, 2020 Challenge Cards, Handcrafted Cards

Hey, this “Fun with Dies” Challenge is the part 2 from the “Alcohol Inks” Challenge, basically. Two birds, one stone.

We last left our heroine (me) with lightheadedness and some kind of ugly first tries at alcohol inks. But now you get….the rest of the story!

If you read that last post, you’ll know that I decided to die cut my rather unsightly first alcohol ink attempts hoping that this would make them usable.

And it did!

fun with dies challenge

I much prefer the look of the one color plus gold mixative, but the others aren’t too bad. Artsy fartsy and all that. So after die cutting them, I chose background papers and built then cards based on the mood and colors in the die cuts.

Here are my double-duty entries into both the “Alcohol Inks” Challenge and the “Fun with Dies” Challenge. And since ’tis the season, I made them all Christmas themed.

Merry & Bright Wreath

This is my least favorite of the five. I love the die itself, but it’s larger than a standard A2 size so I don’t use it very often. I allowed it to be trimmed short on one side and just positioned it flush with the card top fold as if I had always intended it to be that way.

Hey, work with what you got!

The colors on this one ran together so much that it made for a rather busy color combo so I kept the background papers simple and solid. I did, however, use trim the red cardstock with some scraps from the experiment. I also used those scraps to back the sentiment.

merry and bright wreath

The Ornament

Using a die from a recent Hero Arts kit, I made one of the alcohol inked cards into an ornament shape. This was pretty busy too, but looked kind of high end and glam so I paired it with a gold and white patterned paper and a simple gold trimmed sentiment.

ornament card

Merry Christmas Wreath

This wreath die cut, unlike its cousin in the first example, actually does fit the A2 card size! Huzzah! I thought this one looked nice on some cardstock from a recent Simon Says Stamp kit that I then trimmed with gold metallic tape.

merry christmas wreath

Joy

This card turned out just lovely. I used one simple leaf die to cut the cardstock at random places that had a lot of color variation in the teal ink. I arranged them into a wreath shape onto gold metallic cardstock.

Using an alphabet die set, I cut out the letters for the word “joy” from the leftover scraps. The overall effect is so much prettier and more elegant in person. Hard to photograph the metallic papers for me.

joy wreath

Peace

My favorite one. It’s not what I would normally design. But the overall look of this card….yeah, I just really love it.

I paired this orange-red and metallic gold alcohol ink experiment with some patterned paper from a Simon Says Stamp card kit. Die cuts were used to create the branches and the word “peace.” And I used some gold scrap from the Joy card to trim the edge by the word “peace.”

And that’s it, y’all. I flirted with death (why am I so dramatic about the fumes?), lived to stamp another day, and now have five entries into both the “Alcohol Inks” and “Fun with Dies” challenges.

Now, I’m off to write my memoirs about my near-death experience. Pretty sure I’ll be on a TED talk soon, so be on the lookout for that.

Y’all take care!

Leave a Comment Categories: Challenge Cards, Handcrafted Cards
Share :

“Anything Goes” Challenge

December 1, 2020 Challenge Cards, Handcrafted Cards

Simon Says Stamp Wednesday Challenge this time is no rules–just anything goes!

anything goes challenge

As much as I love freedom, you’d think I’d cheer with an “Anything Goes” challenge theme. But what I’ve found is that I actually enjoy some light parameters within which to work. Still, I do love me a challenge, parameters or no.

So, without further ado, here are my five entries into this “Anything Goes” challenge.

Camellia Thanks

Well, I don’t really know if it’s a camellia, but it looks like one to me! I stamped it on cardstock, colored it in with Copic markers, fussy cut it out, and mounted it onto patterned paper.

You can’t tell it from the picture but there’s also super fine glitter on the center parts of the flower.

Simple card, but the camellia is the star of the show!

Birthday Wishes

I have really come to love ink blending. That’s the technique I used to make this rainbow starburst card. Post It notes were used to section off the “rays” and I ink blended between them.

The lines were not as crisp as I’d like so I used different colors of metallic tape to cover them. I love that look!

A simple white-embossed sentiment finishes off the card.

birthday wishes

Busy Bees

The star of this card, in my opinion, is the inked and embossed background. It was touch-and-go for a while there as I got the hang of which colors seemed to work best, as well as which embossing folders worked best.

Simply put, you ink up one side of an embossing folder, carefully lay a notecard down on that inked side, close it, and run it through your die cut machine.

Sometimes it comes out looking like a fail, but once the ink dries, the color usually evens out.

anything goes challenge

Discomfort

This may seem like a strange quote to put on the front of a card, but I sent this specifically to the author of the quote, Brooke Castillo. She’s a life coach, trains other life coaches, and is the host of my favorite podcast (The Life Coach School Podcast).

I just wanted to send her a note of thanks for all the good she puts into the world! And I thought that using this letterboard die set from Sugar Pea Designs was a perfect way to highlight her contributions.

brooke castillo card

Happy Thanksgiving

Look how versatile that letterboard die set is! I get to use it on another card!

The possibilities are somewhat endless for this set as it can be used for any season, any (short) saying, any mood. I love it!

And I think we all know that the vibe of this particular card is especially true. I don’t know about y’all but those Thanksgiving leftovers…..phew. They ’bout did me in.

Embellishments are from a recent Simon Says Stamp card kit of the month (items from that kit also used on this card).

thanksgiving card

Leave a Comment Categories: Challenge Cards, Handcrafted Cards
Share :

“Food and/or Drink” Challenge

November 27, 2020 Challenge Cards, Handcrafted Cards

The most recent Monday challenge from Simon Says Stamp has the Food and/or Drink theme.

Food and or Drink challenge

Well, hi!

Hey, it’s a non-holiday challenge this time. Whaaaaat??

And, it’s one that I had to stretch a little for. Don’t have a ton of food related stamps. Luckily, I pulled it off! Five entries for the Food and/or Drink Challenge await you below!

Burger and Fries

I like this simple card. I think sometimes I overcomplicate a card, or maybe it’s just that I like to do more complicated techniques. But a clean and simple card (CAS) is pretty satisfying when it’s done well.

And I think this one is.

I used stamps from this Sunny Studio set (the same one I used to make this card). To make the plate, I used circle dies. Some patterned paper and a stamped sentiment, and we done, y’all!

food and or drink challenge

You’re The Zest

While perusing Pinterest the other day, I saw a similar card and thought I would recreate it using what I happen to have on hand.

The orange stamp is from a Stampin’ Up! set from way back. You’ll see most of the set in a card further down in this post. I stamped it in a warm gray color but stamped it once in black and colored that in with Copic markers. I used a blue marker to color in the negative space. There’s no gradation in that blue background. It’s just the weird lighting!

I made a sentiment on Canva and printed it out onto cardstock.

you're the zest

Breakfast

This card features another Sunny Studio stamp set that I used to make this card as well. It comes with lots of fun sentiments that can be mixed and matched, but because of the size of this slimline card, I made my own sentiment on Canva and printed it out onto cardstock.

The foods are stamped in black, colored in with Copics, and fussy cut out. I mounted them onto patterned paper and mounted the sentiment above.

And whoever I give this to better believe that sentiment….if I say this to you, I freakin’ love you cuz I love me some breakfast foods!

breakfast

Fruits

Here’s that old Stampin’ Up! fruit stamp set I mentioned above. There are a couple more stamps in that set than what you see in this card, but these are the big ones!

Just stamped in black, colored with Copics, and filled in the negative space with Copics as well. I did some very subtle shading around the outside edge of each fruit. But it’s still blue on blue. Loving this…I mean, it almost looks like it’s just patterned paper and it came this way!

The scripture is printed out using Canva.

fruits

Cookie Sheet

I think this one is my favorite because I had fun making the cookie sheet. I tried to make it look like my cookie sheets….kinda hammered and discolored. But I don’t know that the look translates well on camera.

I cut out some metallic paper and made a score line near the top edge to simulate the slanted edge of a cookie sheet. Using a mini hole punch, I made the hole (I’ve never used that hole on a cookie sheet IRL!). Using brown, rust, and golden stamp pads and sponge daubers I tried to layer some color to give the look of age to the paper.

Now, I don’t have any suitable sized gingerbread men or cookie stamps so I bought some digital stamps on Etsy. I bought a couple of sets….this one and this one. Digital stamps are kind of fun because they can be resized or tweaked before you print them out. I colored them and fussy cut them out and then glued them to the cookie sheet.

Leftover cookies got glued to the, yes, Canva-made sentiment. All items then were adhered to patterned paper on the card front.

cookie sheet
cookie sheet close up

You can kind of see the “aging” coloring on the edges in this pic. My cookie sheets are way more, um, aged than this one.

So. The Food and/or Drink Challenge entries are done! What is your favorite one? And if you can’t answer that….what’s your favorite food and/or drink? 😉

Y’all take care!

Leave a Comment Categories: Challenge Cards, Handcrafted Cards
Share :

Buffalo Check Santa Card

October 6, 2020 Handcrafted Cards, Holiday Cards, Uncategorized

This Santa card with his Buffalo check background was really fun to make and fun to video!

Forgive the vertical orientation for this time lapse video. Having never ever shot one, I really wasn’t sure which way to orient it. I’m fairly techie, but I’m not super current on the best ways to set things up for social sharing. And at the time, I had no intention of sharing to YouTube.

Also, still figuring out the whole overhead camera rig thing. Needs to be more close-up for sure!

Anyhoo…

Much as I would love to have all the bells and whistles that many of my modern card-making mentors have, I am left with what I have on hand. And that’s somewhat dated.

I’ve had this Santa from STAMPIN’ UP! for ages and really just wanted to make a cute and cozy card. I used a vertical lines stencil from Printworks (out of business now, I believe) to create a gingham or buffalo check for the background. The greenery and black trees are made from paper punches, and not the good kind that are easy to punch. No, these are the ones that you get a workout using!

The sentiments and tree are also from SU! but are definitely more timely. I think the black and red cardstock really set things off.

Coloring with “Copics”

I colored the Santa and tree with my Ohuhu markers, and they’re….um…okay. For now. Eventually, I want to have Copic markers which are the gold standard for alcohol-based markers. My Ohuhu’s are not as wet (from what I can tell from other videos) and so the blending is more challenging. Still, I have really enjoyed using them and would recommend them to beginners who need a more budget-friendly alternative.

Since making this card, I’ve had a chance to binge-watch (and I do mean binge!) a true master in the Copic craft: Sandy Allnock. I highly recommend checking out her Copic videos. She also has watercolor, colored pencil, and other videos. I’m just so inspired by how she can take just a couple of stamped images and create a world around them with markers! Amazing!

Anyway, watching her videos has inspired me to be a little more daring in how I color. So I’m much more proud of some of my later cards. Still, this one still gives me all the cozy feels, so I still love it!

Here’s the time lapse of the card creation:

Thanks for watching! Now go create something!

Leave a Comment Categories: Handcrafted Cards, Holiday Cards, Uncategorized
Share :

Get My Latest Posts via Email!

Name

Email


designer spotlight
SSS Monday Challenge Winner

Recent Posts

  • Cards for Ukraine
  • Simple One-Layer Cards
  • Using Airtable to Inventory Your Stamps
  • Catching Up
  • “Beautiful Blossoms” Challenge

Categories

follow me on instagram

Follow on Instagram

Archives

  • March 2022
  • February 2022
  • May 2021
  • March 2021
  • February 2021
  • January 2021
  • December 2020
  • November 2020
  • October 2020

Meta

  • Log in
  • Entries feed
  • Comments feed
  • WordPress.org
Cricketleg Creative. All Rights Reserved.Design by SkyandStars.co
Back Top

Copyright © 2025 · LoveYourself on Genesis Framework · WordPress · Log in