• Home
  • Handcrafted Cards
    • Challenge Cards
    • Quick Tips
  • About Me
  • Shop
  • More Creative Stuff
    • 3D Printing
    • Home Decor
    • Model Railroading
    • Preparedness
    • Sims 4 Builds
  • Recognition

Cricketleg Creative

“Let It Snow” Challenge

December 14, 2020 Challenge Cards, Handcrafted Cards, Holiday Cards

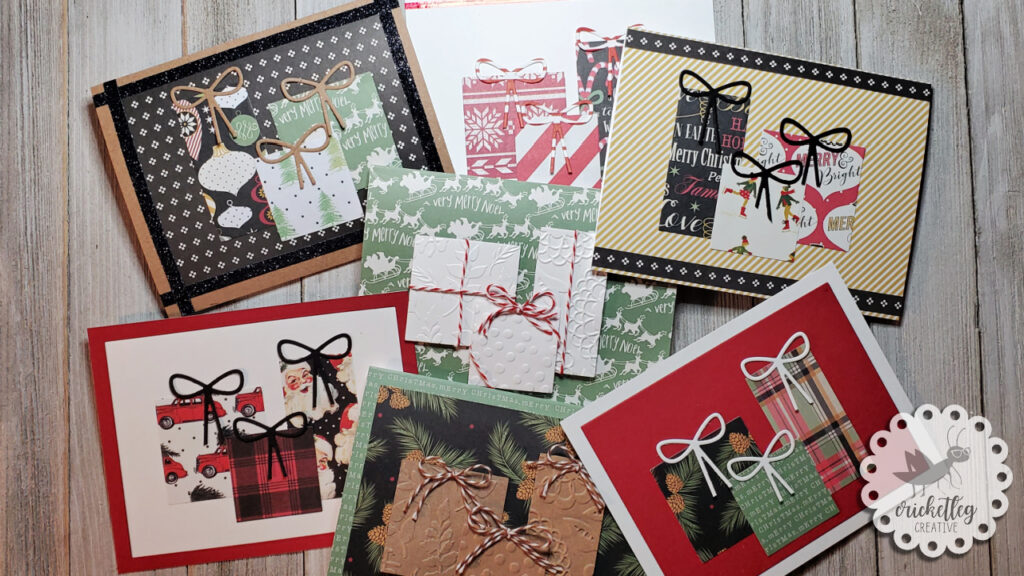
Just two entries this time for the Simon Says Stamp Wednesday Challenge with the “Let It Snow” theme.

Today I have two great entries into the Simon Says Stamp “Let It Snow” challenge. I love them both. ‘Cuz I love snow. Each card entry has snow but using two different media.
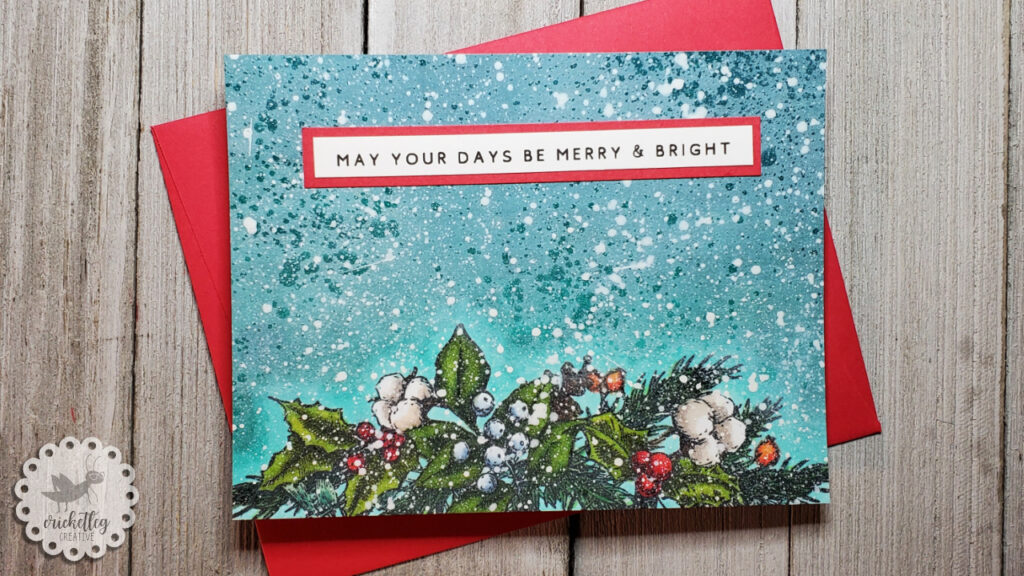
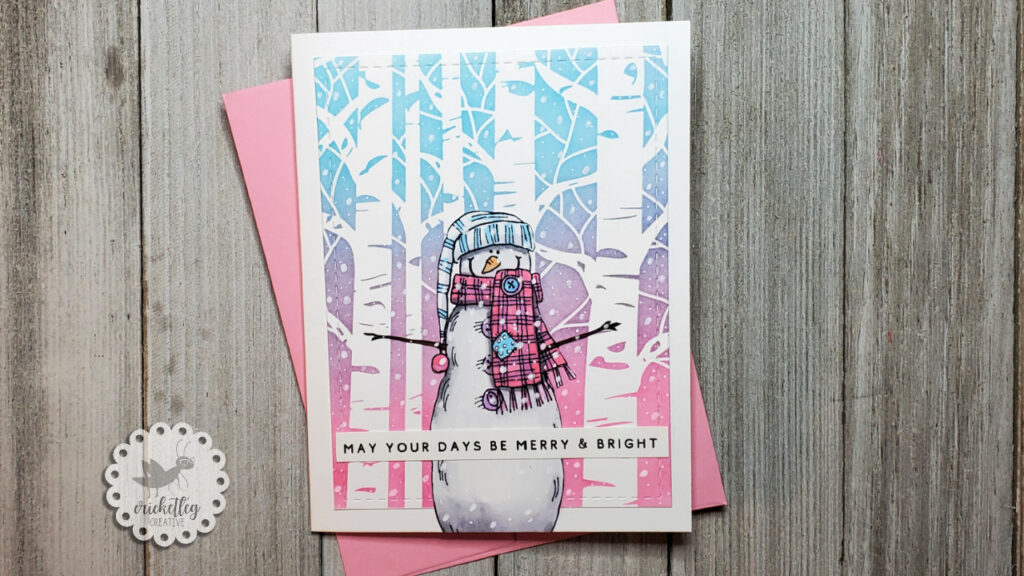
Snowy Greenery

If this card looks familiar, it’s because I also used it in the Monday challenge. This is the one I almost gave up on; so glad I didn’t. I really love the final result. Snowy and beautiful!

Christmas greenery stamp is from Simon Says Stamp. The sentiment is printed from my computer (and is crooked, dangit…oh well).

The snow for this card was made using watered down goache (opaque white watercolor). I used a paintbrush to splatter it on over the top of my ink blending and “failed” resist spray.
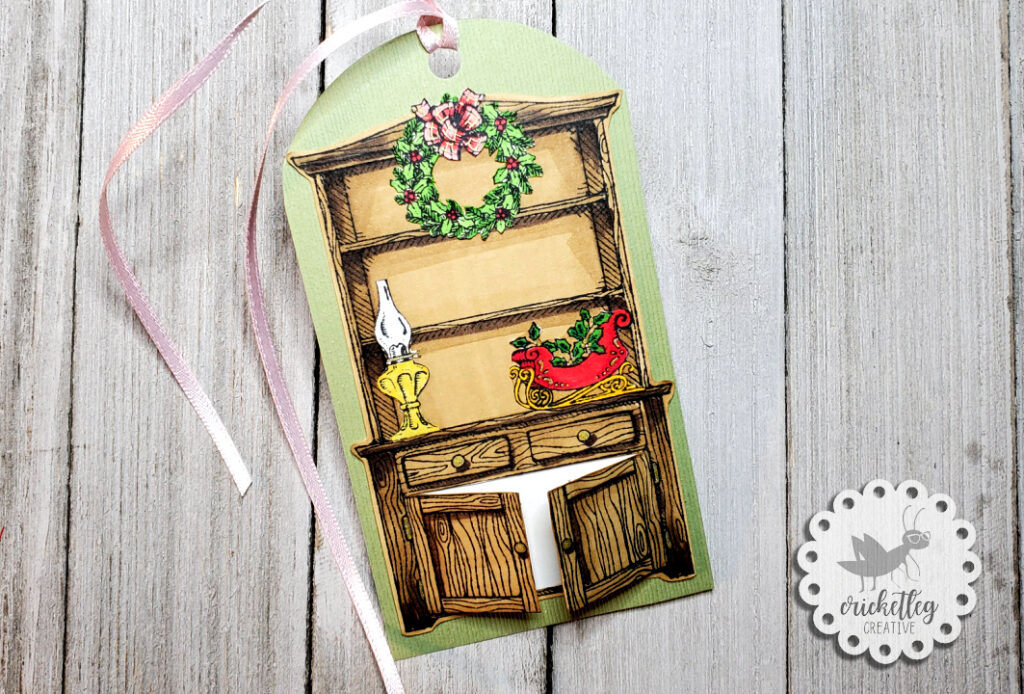
let it snow challenge

New House

My daughter and her husband closed last week on a new home. I thought it would be fun to create a housewarming card with some seasonal charm. But I also wanted to make it look like I had a stamp of their house!

pic to line drawing conversion
(Having more than one image was helpful so I could test colors and techniques)

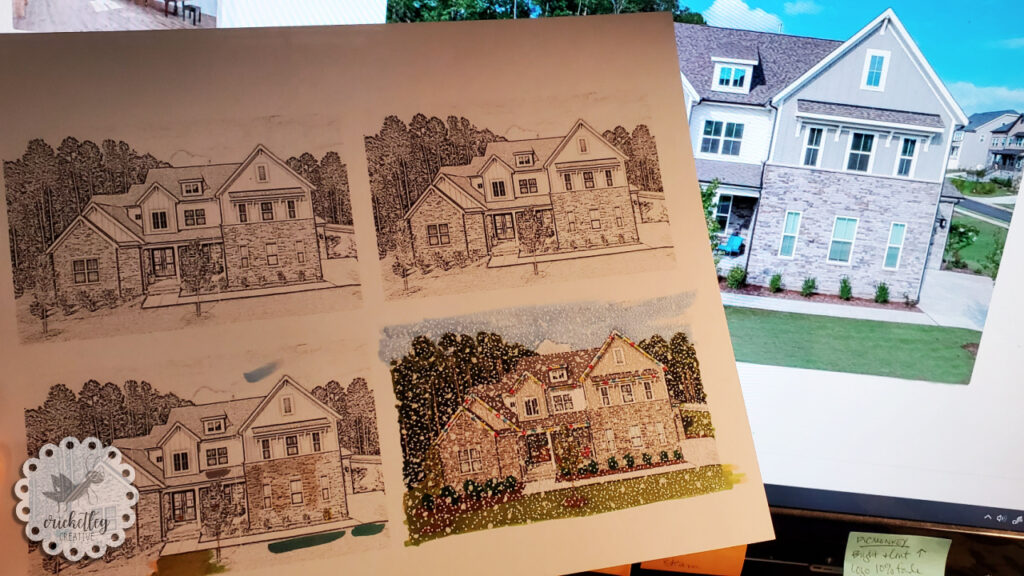
This tutorial helped me to turn a photograph of their new home into a line drawing in Photoshop. Printed out in grayscale, it has the look of a line drawing or possibly a very detailed stamp. I colored it in with Copic markers (the front doors have wreaths drawn in but it’s hard to see) and then I went to town with the white gel pen!

And I’m so happy with my recent purchase of the Boxun white gel pens. So far they are working out great! Easy flow and I love them. I’ll have to report back on how they do over time.

Anyway, I spent way too long (but it was fun) adding in hundreds of tiny snow dots as well as some larger snow blobs for depth. Once that was done, I die cut a “frame” from dark brown paper and added gold accents with a gold metallic gel pen.

Mounted onto plaid paper and with a cozy “Home Sweet Home” sentiment, this card is complete and I love it! It was so satisfying to work on. I love learning new things! I may use this photo-to-line-drawing technique in the fugure. Combining tech and art has always been fun for me!
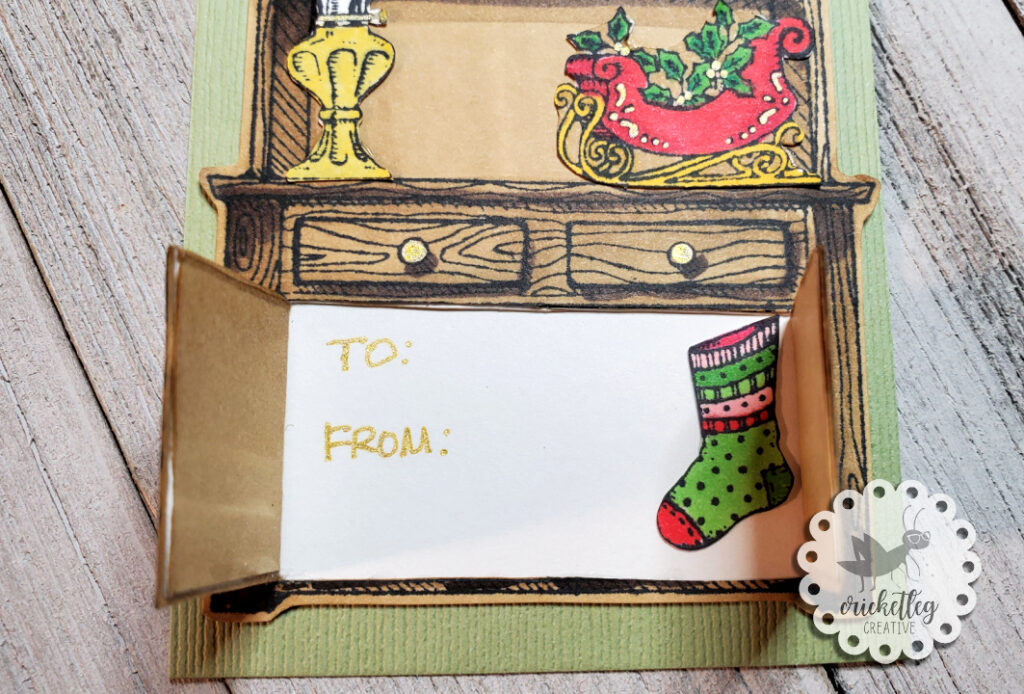
Here’s a close up:

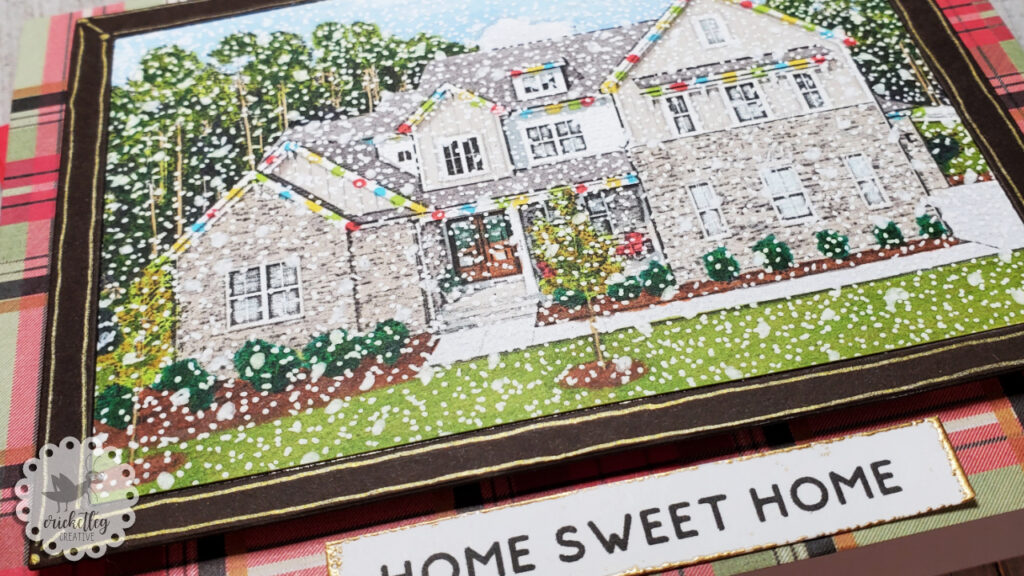
You may be thinking, “Lady, the grass and trees are green….how can it be snowing?” Hmmm. I guess you’d have to live in eastern North Carolina to understand the dichotomy. It happens, folks.

Y’all take care!

Leave a Comment Categories: Challenge Cards, Handcrafted Cards, Holiday Cards
Share :

Clean and Simple Christmas Cards

December 9, 2020 Handcrafted Cards, Holiday Cards, Quick Tips

This week’s video shows an easy way to create cute but clean and simple Christmas cards.

clean and simple Christmas cards

Well, hi!

Welcome to this week’s video post. I’m just barely getting this one in under the wire for my normal Wednesday video posts. I’ve been trying to get the voiceover and final edits done but between my alcohol inks adventure, lack of sleep, and a cold that keeps attempting to take me out, I’m only just getting this finished TOday.

But, hey, it’s done and it’s cute.

Have you heard of CAS cards? It just means Clean And Simple. They are usually pretty easy to crank out and are also usually fast. The Christmas cards in this video came together pretty quickly.

Products used in this video? Patterned paper, baker’s twine, embossing folders (on some of them), gift shaped dies (square and rectangle), a bow die (on some of them), and a few embellishments on some like metallic or glitter tape.

CAS cards are a good way to get into cardmaking. They usually don’t require many materials and, like I said, they come together quickly.

I still prefer a more complex design myself because I enjoy the process. But it’s nice to know that if you need a card in a hurry or if you need to make cards en masse, CAS cards can be a good go-to.

Watch the video below to see my clean and simple Christmas cards. And please visit my channel and subscribe. You can click on the little bell there to be notified when I upload new videos (currently on Wednesdays).

I hope you’re having a merry Christmas season so far!

Y’all take care!

Leave a Comment Categories: Handcrafted Cards, Holiday Cards, Quick Tips
Share :

“Christmas” Challenge

November 24, 2020 Challenge Cards, Handcrafted Cards, Holiday Cards

Simon Says Stamp Wednesday challenge entries for the “Christmas” theme

christmas challenge

Well, hi!

Another Wednesday happens, another Simon Says Stamp Wednesday challenge! Y’all I don’t know what I’m gonna do once the holidays are over because making Christmas cards is my literal favorite. And the challenges have been lining up pretty well with that lately!

But enough about the holiday obsession, let’s get on with this challenge’s entries, shall we?

Popcorn Strings

I used a popcorn stamp, stamped it with white pigment ink, and also used white embossing powder. Then I used what I think is probably a blueberry stamp for the cranberry! I added some shading around the edges.

The sentiment is an old Printworks (now defunct) stamp. I trimmed the cut-out sentiment with metallic red tape. The whole thing is mounted onto kraft cardstock.

Christmas challenge

Winter Stencil

Recently I purchased this Carta Bella Winter stencil and have been itching to use it. Initially I figured I would use red, green, or blue ink onto white cardstock but at the last second I opted for white pigment ink on red cardstock. Oh what fun!! I love it. And it kind of has a pinkish hue.

On top of that background I mounted three layers of a Merry Christmas Wreath die cut from Sissix. I have to admit that it looks better in person; looks a little busy in the photo.

winter stencil

Christmas Bell

When I saw this stamp set in action I was amazed at how realistic the bell stamps! I mean, it totally looks metallic! This is due to stamp layering. This bell is stamped using three layering stamps and three ink colors. The results are so much fun!

This is a simple card; I really wanted the bell to be the focus. All the images you see are from this stamp set by Sunny Studios.

christmas challenge bell

Forest Snowman

This card features another stencil that I recently acquired, but this one is from Crafters Workshop. I’ve been in search of an inexpensive Aspen tree stencil or stamp or die to use. I see so many amazing cards that have these beautiful trees and I just wanted to make that look a reality in my cards.

So I used a pink, a purple, and a blue ink pad along with these amazing blending brushes to create a lovely winter sky behind the trees. Then I stamped this Stampin’ Up! snowman (from 1997, y’all!), colored him with Copic markers, and fussy cut him out. He’s mounted just in front of the trees, which I also die cut using a Waffle Flower stitched rectangle die.

The sentiment was made using my computer!

forest snowman

Christmas Beach

Can I go here for Christmas? I mean, we don’t get white Christmases here anyway so I might as well just go to a tropical island right?

Okay, well, anyway….this is my favorite of my Christmas Challenge entries. The water and Hello! stamps are from a Hero Arts stamp set (the water is made using three layering stamps in three different colors) and the palm trees are from some random stamp I bought many moons ago.

I used a white pen to add the foam to the water and sand. The sky was made using ink blending. The Christmas lights? Well, those took a little more thinking. There are no string lights in my stamp collection, sadly. So I drew a string line between the palm trees with a black felt tip pen and used a super fine brush to apply little dabs of acrylic craft paint for the bulbs.

Gosh, I love a good tropical Christmas scene!

christmas beach

Here’s a close up of the sea foam:

beach

So, there they are…all my Christmas Challenge entries! I hope that one of these will win the random drawing or the a designer spotlight! Did I tell you that I won one of the random drawings the other day? Yep. And I love me some free merch!

Y’all take care!

Leave a Comment Categories: Challenge Cards, Handcrafted Cards, Holiday Cards
Share :

“Happy Holidays” Challenge

November 20, 2020 Challenge Cards, Handcrafted Cards, Holiday Cards

Monday Challenge from Simon Says Stamp this time is “Happy Holidays”

happy holidays challenge

Well hi!

Welcome to another edition of Julie Enters Card Challenges! This time the challenge is creating anything with the theme of Happy Holidays!

As luck would have it, I was already working on this theme so I’m able to crank out some entries really, really fast!

Ready to see? Let’s go!

Baby, It’s Cold Outside!

I’ve been really wanting to use my new blending brushes because up till now, I’ve been using the wooden handled, foam circle ink blending tools. I have to say the blending brushes are just so comfortable to use and it feels easier to get a smooth blend. Making that blue shading around was so much easier than the other tools I have.

Stamps are from Stampin’ Up!, except for the snowflake stamp which is Posh Impressions.

happy holidays challenge

Merry Christmas Wreath

This card is the first of two I’m sharing in this challenge that use glitter and double stick tape backgrounds. Check out my most recent blog post to see how those backgrounds come together.

Finishing off the card is a die cut with just the greeting and berries colored in. I love the simple color scheme but kind of blingy look!

Merry christmas glitter stripes

Christmas Letterboard

As I was perusing other papercrafters’ entries into a recent challenge, I saw that someone had an entry featuring a letterboard die set. Not knowing this even existed, I got so excited and immediately went and bought it!

It’s really fun to use, although a bit time consuming to place the letters. Pretty quickly I figured out that placing the letters upside down and in reverse order on some temporary tape helped tremendously with placement! I could just finish an entire line on the tape, apply liquid adhesive carefully to the letter backs, and carefully place the entire line down on the board. Then I gently removed the tape while holding down the letters.

I have been having so much fun with this die set! So many possibilities!

amazon card

Gift Bags Slimline

I almost labeled these as shopping bags, which I guess they could also be. But they really look more like gift bags I suppose. Once I chose the coordinating papers, the card came together very quickly. I used some of the patterned paper to line the envelope.

I love making slimline cards as it gives me quite a bit of room to spread things out! It’s just the right space for this card.

Candle wick is what I used for the handles. Hey, it’s what I happened to have on hand! I used some washi tape from my most recent Hero Arts monthly card kit.

happy holidays challenge

Red and Pink Stripes

So here’s the second card I’m sharing where I used my glitter and double stick tape trick. It’s pink glitter stripes on red cardstock, which is a striking and nontraditional color combo.

The ornament is stamped from multiple stamps from another Hero Arts kit. I added die cut white “greenery” from another die set and I used red/white baker’s string to “hang” it from the card top.

red and pink stripes

So there you have it! Have you started making or picking out your Christmas cards yet?

Y’all take care!

Leave a Comment Categories: Challenge Cards, Handcrafted Cards, Holiday Cards
Share :

Snowy Lamp Post Card

November 9, 2020 Handcrafted Cards, Holiday Cards

This card features a solitary lamp post against a snowy background

Yes. Yes, another Christmasy card. Sorry, I can’t help it. Plus, I haven’t used this die set since buying it and I really want to play with it.

I also wanted to try something just a little different than what I normally do for a snowy background. Typically, I try for something blended. I’m either using ink blending tools with stamp pads for a soft blended sky or I’m using Copic markers to make a more bold sky but still with a soft transition between colors.

For this Snowy Lamp Post Card I wanted to do something less realistic and that would draw the focus right to the lamp atop the post. I achieved this with a die cut circle as the “glow” for the lamp candle.

Watch the video to see how I made the snowy background as well as how I finished the glowing circle.

I’d love to hear from you so let me know what your favorite way to make snow for cards is. And feel free to check out my most recent Christmas card here.

Oh, and if you want to know how to get my hi-tech splatter and spray box, make sure you check out Simon Says Stamp’s monthly kit which comes with a free hi-tech splatter and spray box. (I’m being sarcastic…it’s just the box y’all, but you should still check out getting monthly kits.)

That’s it! Y’all take care!

Leave a Comment Categories: Handcrafted Cards, Holiday Cards
Share :

Christmas Tags Challenge

November 6, 2020 Challenge Cards, Handcrafted Cards, Holiday Cards

Simon Says Stamp Monday Challenge this week is Christmas Tags!

Christmas Tags together

Well, hi!

Welcome to another post with entries to the Simon Says Stamp Monday Challenge. This week’s challenge involves making Christmas tags. It’s coming, you know.

The ideas for these came together pretty quickly. They were fun to make, but one card gave me a struggle. Can you guess which one?

The Gift Box Tag

I thought it might be fun to make a tag for a gift that looked like, well, a gift with a tag!

I cut out a rectangle in the size I wanted and snipped off two opposite corners at an angle. I applied patterned paper to what would be the “sides” of the box (left side and bottom). Then I added paper to the “top” of the gift box.

I stamped the ribbon twice on cardstock using an old Posh Impressions stamp I have. One of the images serves as the main part of the ribbon and the other image I cut up to finish off the ribbon going around the gift box.

I applied a little tag with a to/from inside, and it was done. A fun, quick, cute little tag I think.

gift box tag

The Stained Glass Tag

I’ve been having fun stamping on vellum and coloring in with alcohol markers to see what happens. After stamping this stained glass stamp (Stampin’ Up!) with Memento Tuxedo Black ink onto a patterned vellum, I allowed it to dry but eventually used a heat tool to finish the drying.

I colored it in with my Ohuhu markers. What’s interesting to me is that when you apply a second layer of marker the color kind of does this weird thing that ends up looking more like stained glass. Kind of hard to tell in the picture, but it leaves an uneven blend which I think mimics a rustic stained glass pretty well. In the picture below it’s most noticeable on the tree trunk.

stained glass tag

The Lighthouse Tag

I thought it might be fun to do something less traditional. Well, at least not your typical Christmas snow scene. So I pulled out this lighthouse stamp from Stampin’ Up!

Things were going great at first. (By now, you have guessed that this is the problem child of the group.) I stamped it with Memento and colored in with my alcohol markers. No problem. Everything was looking great.

Then I used my white gel pen to add snow.

And that went pretty well. For everything that was NOT burgundy.

I tried doing multiple coats. I tried adding glitter. I tried adding matte snow pieces. I tried acrylic paints. Nothing would completely cover up that hot pink that resulted from trying to top burgundy with white!!

But I just kept adding layers until I could get it MOSTLY under control. So my next question is….HOW ON EARTH DO YOU ADD SNOW TO ANYTHING RED? I’ve never had this problem before!

You may not be able to tell from the picture below (I photographed it immediately after topping with another layer of acrylic paint!). But it’s so small, maybe nobody will notice!

lighthouse tag

The Ornament Tag

I used stamps and dies from the Hero Arts monthly kit from this October to make this shaker tag/ornament. Tags like this are fun because the tag becomes a gift too!

It was the quickest shaker I’ve ever put together! Having the dies from the kit really helped the layering to go fast. You can see another shaker card I recently made here.

You could add an additional small tag to the string (so as not to write on the ornament) or just write the to/from on the back.

ornament tag

The Hutch Tag

I think this one is my favorite. I love the colors and the homey feel. This hutch and accessories stamps are all from Stampin’ Up! and it’s been a good long while since I’ve used this style. These were purchased during the “country” decor phase of rubber stamps back in the 90s. But I can’t part with them. Good memories.

Giving these stamps new life in a tag was a good way to dust them off. I stamped everything separate….no masking…and fussy cut them out after coloring them in with alcohol markers.

Though it is hard to tell in the photo, there are gold accents on every piece. I added the accents after gluing the pieces to the hutch. I backed the hutch door area with some white cardstock after cutting along the door lines. Then I backed the whole thing with a pretty green cardstock.

hutch tag
hutch tag inside

You can see the surprise stocking and the to/from inside the cabinet. Kind of a fun tag to make!

Okay. These Christmas tags are done and done! Hope you enjoyed taking a peak at these tags. And I sure hope you have a solution to my burgundy/hot pink snow problem! If so, please…..advise!

Y’all take care!

3 Comments Categories: Challenge Cards, Handcrafted Cards, Holiday Cards
Share :

Holiday Ice Skates Card

November 5, 2020 Handcrafted Cards, Holiday Cards

Lovely ice skates bordered by snowy greenery for a beautiful holiday card!

holiday ice skates card

My favorite cards to make are holiday cards, specifically Halloween, Thanksgiving, and Christmas. But my all-time favorite is Christmas. I’ve loved Christmas since I was a small child! Creating a whole mood with a Christmas card is just so satisfying!

When I thought up the design for this card, I got so excited to make it! I’m not an ice skater, but I love ice skating. In fact, one of my very favorite Christmas movies, The Bishop’s Wife, features an ice skating scene that I just adore! (I just tried to find a link to that scene, but no luck…sorry.)

Anyway, I love the look of ice skates hanging with greenery. So cozy and vintage feeling. So I was very excited to shoot a video featuring that on this card. Other than the tiny laces and berries, everything went together very quickly.

Another beautiful look for this card would be to switch the card base to kraft paper and the ice skates to white cardstock. That would be beautiful and the snowy splatter would show up even more. Hmmm….I think I have something to go do right now.

Enjoy the video, and please leave me a comment and let me know your favorite Christmas movie!

Check out some of my other Christmas cards here and here.

Y’all take care!

Leave a Comment Categories: Handcrafted Cards, Holiday Cards
Share :

Quick & Simple Christmas Cards: Masked Trees

October 29, 2020 Handcrafted Cards, Holiday Cards

This quick and simple Christmas card technique of masked trees might be just the ticket for your holiday cards this year!

quick simple christmas cards masked trees

Well, hi!

Welcome back to the blog, and welcome to an idea that has literally been years in the making.

Okay, maybe that’s too dramatic. But I really have been itching to try this technique. Well, my version of it anyway.

The Idea

I saw someone on social media mask off some watercolor paper in a triangle tree shape and make cool droplets of color inside the mask. Once the water/paint droplets had dried, there was this cool effect! I figured I’d try it with stamping.

When I started to look through my stamps I realized that the stamp I was envisioning was not in my possession. Dang it! Oh well, regroup and recalculate.

What I Ended Up Doing Instead

What I ended up on turned out great! I used ink blending and a single, repeated stamp with tone on tone colors. The idea and technique is so simple I figured why not try it with more than one color scheme.

Once I chose the tone on tone color, I knew I wanted to keep the rest of it simple too. There are only three stamps total used. One sentiment, one tree topper bow, and the border stamp that gets repeated on the tree.

These cards went together so fast I’m actually rethinking my original 2020 Christmas card design idea.

Watch for yourself in the video below. Leave a comment and let me know which color scheme you like best. Personally, I was surprised by my preferences!

If simple is not your style, check out a more detailed Christmas card here.

Y’all take care!

Leave a Comment Categories: Handcrafted Cards, Holiday Cards
Share :

Winter Camper Slimline Card

October 26, 2020 Handcrafted Cards, Holiday Cards

This Winter Camper Slimline Card will make you a happy camper!

winter camper slimline card

Well, hi!

I’ve only recently begun experimenting with slimline cards. If you don’t know what slimline cards are, they are simply cards that will fit into a legal size envelope. That’s the basic shape.

You can make them horizontal/landscape orientation, like the one above. Or you can make a really tall card by orienting it vertically/portrait.

One of the things I love about slimline cards is the freedom it can give you! I have alphabet dies, for example, that I love but I can only fit four letters across a landscape A2 sized card. With a slimline card, I have a lot more word options.

With my Winter Camper Slimline Card, I had the space to make a nice, wide scene. No crowding the images! Had I done an A2 sized card, I likely would have left out the snowman entirely. I really wanted space in this snow scene.

My experiment with making glowing Christmas lights worked out pretty well, I think. They look glow-y to me anyway!

Although I could stand to do more in the way of shadow and light, I’m learning! And the practicing has been really fun. You can see some earlier examples of me working on night skies here and here.

So check out the whole video below! I hope you enjoy it!

Y’all take care!

4 Comments Categories: Handcrafted Cards, Holiday Cards
Share :

“Not a Card” Challenge

October 23, 2020 Challenge Cards, Handcrafted Cards, Uncategorized

My examples for the Simon Says Stamp Not a Card Challenge

simon says stamp challenge

This week’s Simon Says Stamp Monday Challenge is “Not a Card.”

I have to admit that I was not excited about this one because I’m super focused right now on making lots of CARDS for my Etsy shop! So “wasting” time on something not card-related seemed like a bother.

But I actually had a lot of fun working on these projects.

Candy Bag Topper

Having recently cleaned out my candy, cookie, and cake stuff I knew I had some treat bags waiting to be used. Halloween candy seemed the perfect match for these, and timely.

I grabbed a notecard just a little wider than the bag and folded it in half. I stamped the front of the card with an old stamp set from Stampin’ Up! And I mean from back in the 90s!! It’s always been a fun set to use.

I filled the bag, placed the card over top, and stapled it in place. Easy!

simon says stamp challenge

Recipes

Okay, technically this is a card…but it’s not a greeting card so I say it counts!

Another oldie but goodie from back in my Stampin’ Up! demo days, this recipe card stamp is pretty cute and came with all the basic recipe category stamps too.

I stamped the main card stamp onto cream cardstock. Then I used the Main Dish stamp in the bottom right corner. I just did some simple colored pencil work….it’s too detailed to do much more.

This is a great idea for when you need to take a meal to someone. Why not share the recipe, if it’s one of your best? And doing it with stamps is more fun!

simon says stamp challenge

Planner Embellishment

I love, love, love my planner. Took me years to find one that works for me.

I thought it might be fun to embellish it a little. Not necessarily to make it pretty because I have come to be a firm believer in kind of a messy planner. Or should I say well-filled?

I just wanted to add a little visual to my upcoming week.

So for a youth campfire I added a flame stamp. For my daughter’s bone marrow donation day I added a gift stamp (what a gift she is giving! so proud of her!). For family game night, I added a confetti stamp in multiple colors. And for my day to work on Christmas cards, I stamped a little tree.

I actually think I may do this on a regular basis. Because I block my time off with highlighters and have some repetitive items, sometimes I forget which week I’m on. Having a visual reminder–“oh yeah, this is the week with the campfire night”–will be helpful for my brain!

simon says stamp challenge

Gift Tags

Can I make a confession here? I don’t do gift tags.

Why? Well we have this fun tradition I started a few years ago where I don’t label the gifts to the kids. I pick a different paper to represent each person each year and my kids have to figure out who is who! It’s really fun. One year I even decoy wrapped everything–I wrapped it once in the correct paper for that person, and then again in a “decoy” wrap to confuse them.

Yes, I am looney.

But really, they were getting too good at guessing based on what people had on their lists. I add extra padding, coins, etc., to throw them off base.

Anyway, I digress.

Even though these tags will not be used for the family gifts, I will have fun using these for gifts to friends. Die cuts used for some, stamps for others.

simon says stamp challenge

Christmas Card Log Book

And now to my favorite result of this challenge!

I’ve had this Christmas Card Log book for YEARS!!! I think I got it free. I know I’ve always hated the cover. Just not my style at all.

It happened to be sitting out on my stamp desk, and I thought, “Hmmm…can I make it cute?”

Answer: Yes. Yes, I can.

Many of the stamps I own I have had since the early 90s. I remember thinking when I saw the stamp of a blank card, “Oh, that’ll be fun to use!”

Yeah. I never used it.

But now I have! I really enjoyed just making this up as I went along. I made lots of little Christmas cards to adorn this new log book. Then I masked them off with Post-Its and did some ink blending around them. That really made them pop!

Now I’m excited to mark off who I’ve sent cards to and who have sent cards!

simon says stamp challenge

So there you have it. All five of my entries into this week’s challenge. And I have to say, these ideas were fun and pretty fast! While I enjoy making a beautiful card to send, it can take a while. It was fun to make some things that were quick!

Check out the last Simon Says Stamp challenge I did.

Leave a Comment Categories: Challenge Cards, Handcrafted Cards, Uncategorized
Share :

Get My Latest Posts via Email!

Name

Email


designer spotlight
SSS Monday Challenge Winner

Recent Posts

  • Cards for Ukraine
  • Simple One-Layer Cards
  • Using Airtable to Inventory Your Stamps
  • Catching Up
  • “Beautiful Blossoms” Challenge

Categories

follow me on instagram

Follow on Instagram

Archives

  • March 2022
  • February 2022
  • May 2021
  • March 2021
  • February 2021
  • January 2021
  • December 2020
  • November 2020
  • October 2020

Meta

  • Log in
  • Entries feed
  • Comments feed
  • WordPress.org
Cricketleg Creative. All Rights Reserved.Design by SkyandStars.co
Back Top

Copyright © 2025 · LoveYourself on Genesis Framework · WordPress · Log in