• Home
  • Handcrafted Cards
    • Challenge Cards
    • Quick Tips
  • About Me
  • Shop
  • More Creative Stuff
    • 3D Printing
    • Home Decor
    • Model Railroading
    • Preparedness
    • Sims 4 Builds
  • Recognition

Cricketleg Creative

Cards for Ukraine

March 9, 2022 Handcrafted Cards

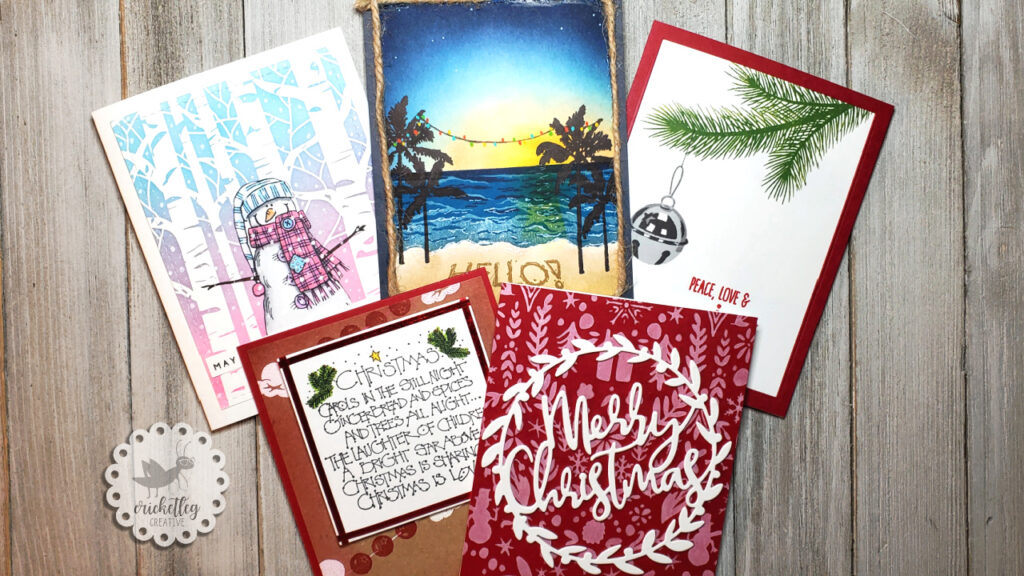
Cards for Ukraine–a movement in the papercrafting world to show support for the Ukraine.

cards for ukraine

As we watch the horror that is happening in the Ukraine, we all feel heartbroken. And helpless to change anything. Many in the cardmaking world have spoken of Ukrainian cardmaking friends who are either in Ukraine or have family there.

Personally, I don’t actually know anyone in or from Ukraine. But I have followed a miniature crafter on Instagram for quite some time who is in Ukraine. I’ve watched with sadness her Instagram posts as she and her family have huddled in the bathroom for safety while the bombs go off outside, watched her flee to an underground shelter with few belongings. And felt for her as she talks about how cold the shelter is and how scared they all are.

There is little I can do, though I pray for peace and an end to this madness.

#cardsforukraine

Many in the papercrafting and cardmaking world have turned to cards as a way to express support and love for our Ukrainian brothers and sisters. The call has gone out, for those who would like to participate, to make cards in the colors of the Ukrainian flag and post them to social media.

So, I wanted to join in too. Will my cards solve anything? Likely, no. But as with all cards, they are meant to bring a little bit of joy into the world. So here is what I share–my #cardsforukraine.
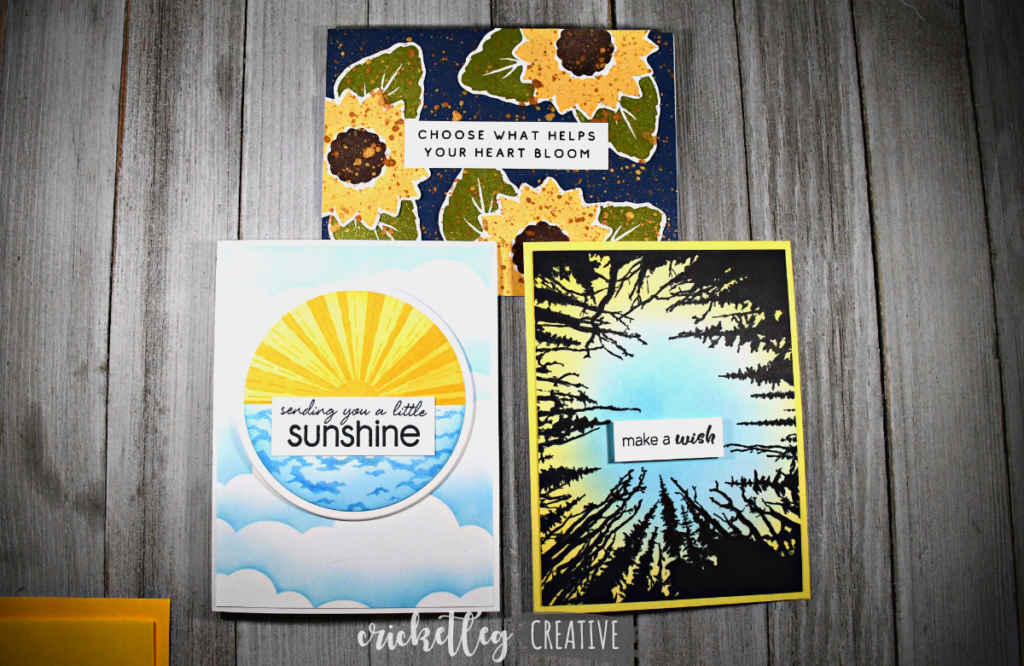
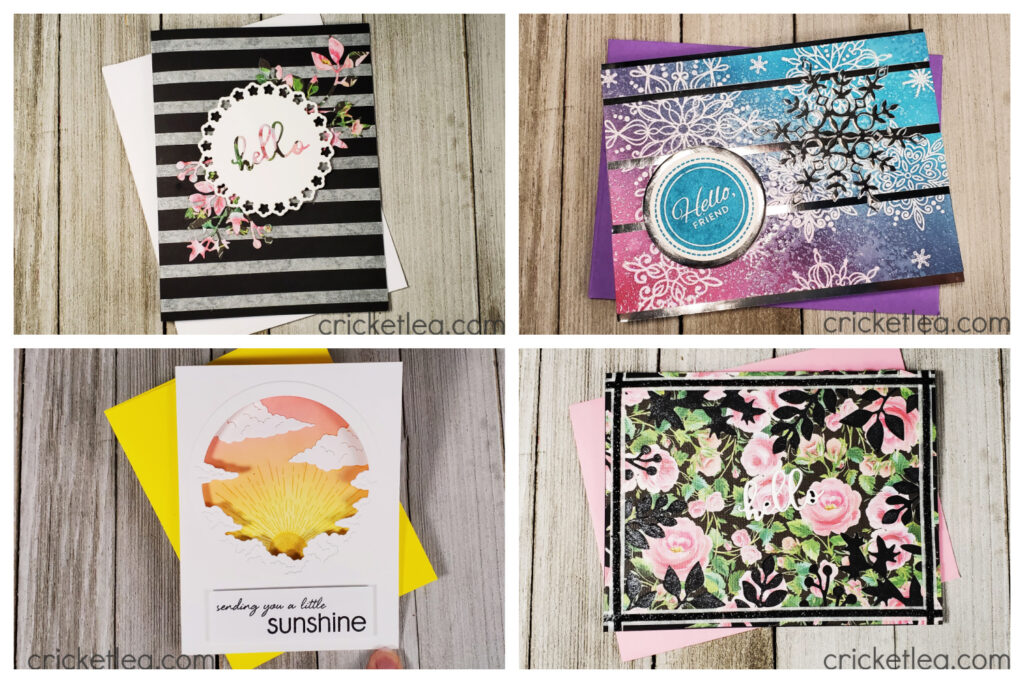
Sunflower Card

Did you know that the sunflower is the national flower of Ukraine? I didn’t until the Cards for Ukraine movement began. I read somewhere that throughout the history of Ukraine, the sunflower as been a symbol of peace.

This card was made last year using stamps from a Stampin’ Up! set. I printed the sentiment from my computer. Gold metallic watercolor across the flowers and the dark blue background complete the card.
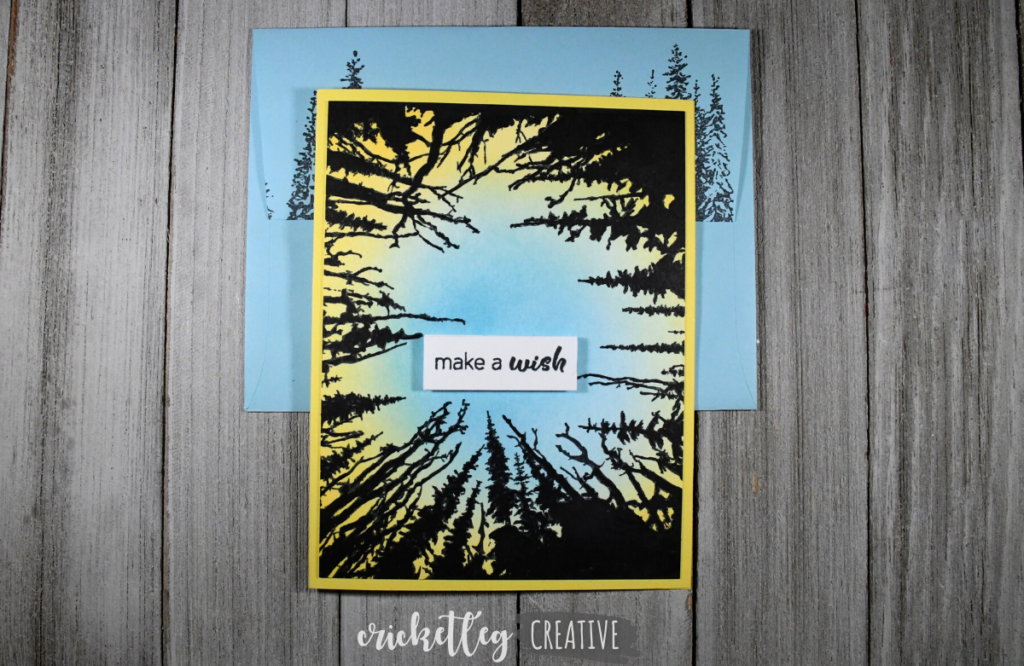
Make A Wish Card

I have had this Hero Arts Cathedral of Trees stamp for quite some time, but finally put it to use on this simple card. Ink blending for the sky, in the Ukrainian flag colors and a Hero Arts sentiment from one of last year’s monthly kits complete the card.
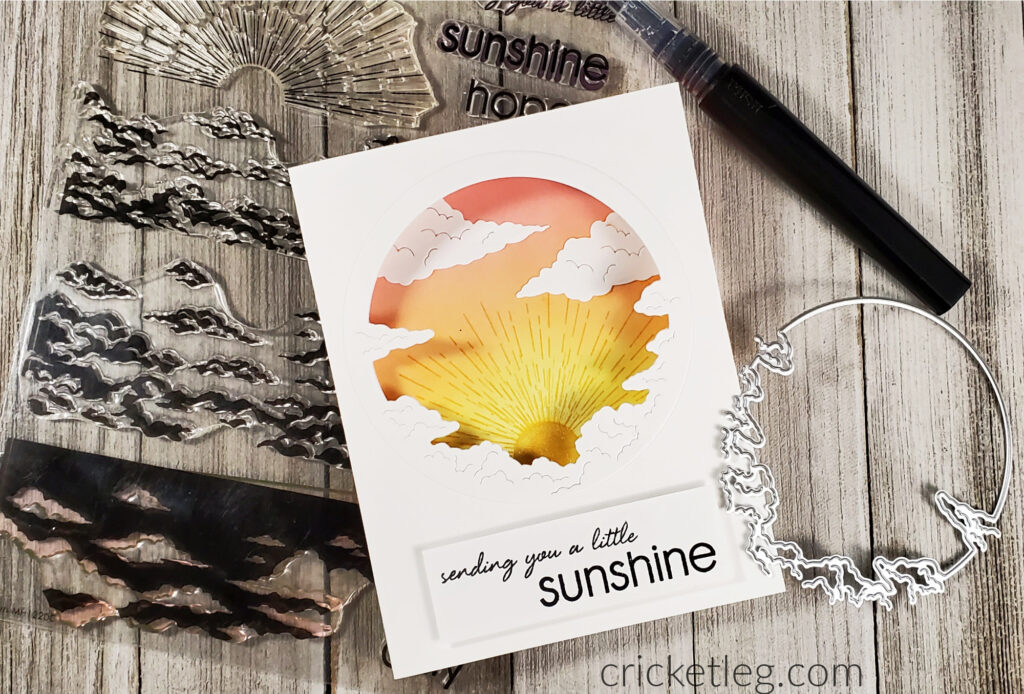
Sunshine Card

Of the three, this is my favorite. And I so wish I could send some sunshine to all the people suffering in Ukraine right now.

I used a stencil from the Simon Says Stamp to create the background. Then used stamps from a 2020 Hero Arts monthly kit to make the center image (on a circle die cut).


Praying for peace. молиться за мир.

Leave a Comment Categories: Handcrafted Cards
Share :

Simple One-Layer Cards

March 2, 2022 Handcrafted Cards, Quick Tips

You can make really sweet and simple one-layer cards with very few stamps.

simple one layer cards

I love a really juicy intricate card. They usually take a while, but when you look at the final product you’re super satisfied with the results.

Here’s the thing though….you can actually make a beautiful, sweet card with a simple design. It can take less time and effort but it’s just as nice to look at when you’re done.

And, to be honest, sometimes I like a little empty white space on a card.

This type of design piqued my interest recently when I watched my mentor, Sandy Allnock, feature her Copic Coloring vignette cards on YouTube. I was convinced that this was one of the next projects I needed to try.

Why This Design Is Easy

Whether you call them “simple one-layer cards” or “vignette cards” the design idea in this case is the same: pick 2-3 smaller stamps that go together and pair them with a small sentiment.

In Sandy’s video, for example, she featured a very cute sea themed card with 3 sea critter stamps paired with “you’re turtley awesome.” Very simple, but very cute.

One benefit to this type of design is that it is very likely that, even with a small stamp inventory, you are will have something that works.

I very quickly looked through my clear stamp sets and found ideas right away. You can see below the pairings I came up with. I stamped the designs with Memento Tuxedo Black ink (so it wouldn’t run with the alcohol ink from the Copic markers).

simple one layer cards

Very few supplies are needed for this type of design. As I mentioned above, if you are using Copics you need to make sure the stamp pad you are using won’t bleed when you color the image in. But considering what all can go into making a card, using a stamp pad, a few stamps and something to color with is a pretty small supply list!

That Was Sweet of You

When I was planning out which stamps I wanted to use, I knew I wanted to do three. And I knew I wanted each one to have a different background color, just so I could try it out. The stamps I chose to use worked perfectly for this.

The first card I planned used some candy stamps from the Sweet Truffles set from Simon Says Stamp. I masked one of them so it would look like one was in front of the other. I paired these sweet stamps with a sentiment from the Hero Arts You’re Top Tier set.

After coloring in the truffles, I used some light pinks to color a bit in and around the images, fading out with a lighter pink marker on the edges.

I finished off the design by adding some gold accents with a metallic gold gel pen. And I used Nuvo Crystal Drops in red and white to add some dimension to the truffles.

And I took a tip from Sandy and used my Copic colorless blending marker in the pink shaded area. I drew small hearts.

You Are Fairy Kind

All three stamped images came from the Hero Arts My Monthly Hero Kit from July 2021. This is such a cute set–full of gnomes and mushrooms and woodland accents. Just adorable.

Though I really, really, really wanted to do a gnome card, I just couldn’t get past the sentiment “you are fairy kind.” I wanted all these cards to be thank-you cards so I focused on the sentiment.

I used the mushroom house, the fairy, and the sentiment. Once they were colored in, I used light greens to do the background color…fading out again so that the green faded softly.

I added some Stickles clear glittery accents on the fairy dust. The colorless blender also added some dot texture to the background.

You Lift Me Up

For my last simple one-layer card, I chose to use stamps from another My Monthly Hero Kit. This one from June of 2021.

Another simple design, with just the balloon stamp, the cat stamp, and the sentiment. After coloring in the cat and balloons, I used light blues to fade out on the background.

As one last reminder, I recommend using high quality, heavy cardstock for your coloring. You’ll get much better results. I use 110 lb. Neenah white cardstock.

And you don’t have to have Copics. I’ve used cheaper alcohol markers than Copics (but I upgraded last year). You could also try using colored pencils.

And that’s it folks. Simple one-layer cards that can be made very quickly but are very sweet. If you have not yet tried simple designs like these, I invite you to give it a try.

Here are a few other simple card designs you might enjoy trying.

Leave a Comment Categories: Handcrafted Cards, Quick Tips
Share :

No-Line Watercolor

March 3, 2021 Handcrafted Cards

Watch me on my first attempt at no-line watercolor.

no line watercolor

Well, hi!

Welcome to this very rough but very fun first attempt at no-line coloring. What’s that you ask? Well, I’m no expert but here’s the basic idea.

You stamp in ink that’s light enough that when you are done painting or coloring in, you no longer really see the lines. It’s just a different look.

I’ve been wanting to try this for a long time but just haven’t gotten around to it. I believe that I picked stamps for this first time that were a little too detailed. Well, the surfboard, for sure. (But man, how awesome is that set?) But that’s okay. This little experiment was just for me. I didn’t really care if the end result was a masterpiece.

And clearly it is not.

Like I said. It’s okay. It was fun. And relaxing. No-line watercolor is something I hope to try with more stamps soon.

You can watch the sped up process here. I didn’t bother to narrate the video other than an intro and outro. I do, however, have some relaxing tropical music you can vibe to!

Watch my most recent video here, where I do some fun things with highlighters!

Y’all take care!

Leave a Comment Categories: Handcrafted Cards
Share :

“Favorite Technique” Challenge

February 23, 2021 Challenge Cards, Handcrafted Cards

Two entries into the Simon Says Stamp Favorite Technique Challenge…but how can I pick favorites?!

Well, hi!

I tell ya, every time a “favorite technique” challenge pops up I find it hard to choose! I love lots of different techniques. But then I remember…oh yeah, I love ink blending backgrounds. Especially skies.

And since I have a few new additions in my stamp collection, I thought it a good time to combine them with ink blending.

So, here you go…

Mahalo Floral Card

The latest card kit from Hero Arts is phenomenol! Lots of images and dies to play with. It’s been so cold and wet here lately in eastern North Carolina and having fun with some tropical whimsy is just what I need right now!

I wasn’t really sure where I was going with this when I started, but I like where I ended up! I stamped the flowers and leaves using masking, and colored them in with Copic markers. Then, I used Copic markers to make the water background.

In hindsight it would have been much easier to stamp, color, and die cut all those images out. But I do like that there’s no white border around them. So it’s fine; just hard to do the background around all that detail.

I used Glossy Accents from Ranger to make wavy lines over the blue ink background and let it dry. I stamped some other leaves from the Hero Arts set and placed those around the sentiment that I stamped. All those images are from that Hero set.

favorite technique challenge
mahalo closeup

You Warm My Heart Card

The stamps that made this very sweet campfire card are from an Avery Elle stamp set. I’m a bit lacking in the cute critter stamp category, so I recently purchased this set. I love campfires so this one was a no brainer.

I stamped the images I wanted to use first, then colored them with Copic markers, being careful to add some yellow glow to the sides facing the fire. (That racoon gave me some trouble, but that’s in their nature I suppose.)

Once those were ready, I placed them on a notecard just to see where I might want my horizon line. I set them aside and masked off that horizon. For this card I used stamp pads and blending brushes for a softer, more subtle blend. I started in the center where I knew the campfire would be, with yellow. Then a light brown around that, and a darker brown on the outer edge. Same basic idea for the sky.

With a few trees stamped at the sides, I was ready to glue my critters in place. After that it was just a matter of adding starts and sentiment.

I have to say, I think my favorite element on this card is the splatterware mug! I couldn’t help myself there!

favorite technique challenge

Both cards have a blended background. One uses Copic blending and the other uses stamp pads with blending brushes. Both are fun!

View my other challenge cards here.

So there you go! Y’all take care!

Leave a Comment Categories: Challenge Cards, Handcrafted Cards
Share :

“Something New” Challenge

January 12, 2021 Challenge Cards, Handcrafted Cards

Well, hi! And welcome to the entries for the most recent Simon Says Stamp Wednesday Challenge theme of “Something New.”

Fortunately, I have a good amount of “something new” items to choose from as Christmas and my birthday are pretty close on the calendar. I’ve been able to receive and hand pick a few juicy items!

So without further ado, here are my four entries into this “Something New” Challenge. Let’s go!

Sunshine

While it wasn’t a Christmas or birthday gift, it is nonetheless new. What am I talking about? The December Hero Arts kit items used to make this sunshine card. I just barely blogged about this card, so if you’d like to read up on it, you can check it out here.

I love how this card turned out. Very simple and clean and features one of my very favorite subjects to create……SKIES!!!

sunshine card

Snowflakes

Another recent kit treasure is from Simon Says Stamp. It’s the January card kit of the month and it’s sold out! No wonder, as it’s pretty awesome.

It came with all sorts of juicy stuff, as you can see below.

simon says stamp january card kit

For this card I used some of the stamps from the stamp set as well as the snowflake die. I stamped some of the snowflakes with Versamark ink and used white sparkle embossing powder (I believe from Hero Arts) to finish them off.

The background is made using ink blending brushes and blue, pink, and purple ink. To give the background a mottled appearance I sprayed it with a fine water mist. But that didn’t give me quite enough texture. So I sprayed it with Distress Resist Spray and let that dry. I then reapplied some of the ink blending to intensify the color and contrast. Love it.

To give it some interest, I cut up the card and mounted it onto metallic silver paper. The sentiment and the die cut snowflake have that same paper. Kind of fun.

something new challenge

Hello Floral I

My daughter gave me some lovely patterned paper for my birthday the other day, along with some other paper crafting goodies! (Thanks, Audrey!) So I thought for my “Something New” Challenge I could use that paper.

The floral pack of paper is just gorgeous and also has a texture to it. I love black and floral, so I paired some black cardstock with this black and pink floral. Wanting to do something a little different, I decided to use some greenery die cuts and use the negative space left behind as the design.

The “hello” is die cut from the center and then filled back in with a white cardstock die cut. To give it some shimmer, I used my Spectrum Noir glitter brush both on the greeting and on the negative space die cuts.

To finish off the card, I used white and black glitter tapes to create a border around the card. Paired with a lovely pink envelope I think it makes a charming card.

something new challenge

Hello Floral II

After all that die cutting, I didn’t want to waste what came off the above card. So I decided to use those “scraps” to make another card. A sister card to the one above.

After playing around with it for a while, I decided to use that white glitter tape to make horizontal stripes on the card. That scalloped circle makes a nice backdrop for the sentiment from the first card. I mounted that with foam tape so it sits above the paper.

The greenery die cuts from the first card are glued and tucked under that circle. Also charming.

And fast. I love using scraps from one card to make another. It’s a great tip!

something new challenge

Okay, there you have it. Four entries this time for the “Something New” Challenge. And now I’m off to work on a custom client order. I don’t do those often. You can see what premade cards I have for sale in my Etsy shop.

Y’all take care!

Leave a Comment Categories: Challenge Cards, Handcrafted Cards
Share :

“New/Unused Product” Challenge

January 8, 2021 Challenge Cards, Handcrafted Cards

new/unused product challenge

Well, hi! Welcome to a perfectly timed challenge entry for the new/unused product theme from this Monday’s Simon Says Stamp challenge.

Why is it perfectly timed? Not only do I get to use a Christmas present for today’s card; I also get to use my Hero Arts kit from December. I took a stamping break but I keep thinking about this awesome kit and am so excited to put it to good use today!

The circle/cloud die from the set is cut from an A2 white side-folding card. I also die cut another out of scrap but added a plain circle die to the outer edge so I could glue it on top. The set comes with a single cloud die that I cut twice from white cardstock and glued to the inner scene.

That inner scene is created using the sun and rays stamps from the set. The sky is created with an ink blending brush to create the gradation of color in the sunrise. I added some sparkle I used my new Spectrum Noir glitter brush pen for the sun and the rays. Hard to see in the pic, but it’s there and adds a really nice touch.

The sentiment is from the stamp set and is stamped on a piece of scrap cardstock and adhered with foam tape to the front of the card.

It’s simple but I think it’s stunning!

Only one for this time. I’m still gearing back up after the holidays. To see some of my other challenge projects, visit this link.

Y’all take care!

Leave a Comment Categories: Challenge Cards, Handcrafted Cards
Share :

“Christmas” Challenge

November 24, 2020 Challenge Cards, Handcrafted Cards, Holiday Cards

Simon Says Stamp Wednesday challenge entries for the “Christmas” theme

christmas challenge

Well, hi!

Another Wednesday happens, another Simon Says Stamp Wednesday challenge! Y’all I don’t know what I’m gonna do once the holidays are over because making Christmas cards is my literal favorite. And the challenges have been lining up pretty well with that lately!

But enough about the holiday obsession, let’s get on with this challenge’s entries, shall we?

Popcorn Strings

I used a popcorn stamp, stamped it with white pigment ink, and also used white embossing powder. Then I used what I think is probably a blueberry stamp for the cranberry! I added some shading around the edges.

The sentiment is an old Printworks (now defunct) stamp. I trimmed the cut-out sentiment with metallic red tape. The whole thing is mounted onto kraft cardstock.

Christmas challenge

Winter Stencil

Recently I purchased this Carta Bella Winter stencil and have been itching to use it. Initially I figured I would use red, green, or blue ink onto white cardstock but at the last second I opted for white pigment ink on red cardstock. Oh what fun!! I love it. And it kind of has a pinkish hue.

On top of that background I mounted three layers of a Merry Christmas Wreath die cut from Sissix. I have to admit that it looks better in person; looks a little busy in the photo.

winter stencil

Christmas Bell

When I saw this stamp set in action I was amazed at how realistic the bell stamps! I mean, it totally looks metallic! This is due to stamp layering. This bell is stamped using three layering stamps and three ink colors. The results are so much fun!

This is a simple card; I really wanted the bell to be the focus. All the images you see are from this stamp set by Sunny Studios.

christmas challenge bell

Forest Snowman

This card features another stencil that I recently acquired, but this one is from Crafters Workshop. I’ve been in search of an inexpensive Aspen tree stencil or stamp or die to use. I see so many amazing cards that have these beautiful trees and I just wanted to make that look a reality in my cards.

So I used a pink, a purple, and a blue ink pad along with these amazing blending brushes to create a lovely winter sky behind the trees. Then I stamped this Stampin’ Up! snowman (from 1997, y’all!), colored him with Copic markers, and fussy cut him out. He’s mounted just in front of the trees, which I also die cut using a Waffle Flower stitched rectangle die.

The sentiment was made using my computer!

forest snowman

Christmas Beach

Can I go here for Christmas? I mean, we don’t get white Christmases here anyway so I might as well just go to a tropical island right?

Okay, well, anyway….this is my favorite of my Christmas Challenge entries. The water and Hello! stamps are from a Hero Arts stamp set (the water is made using three layering stamps in three different colors) and the palm trees are from some random stamp I bought many moons ago.

I used a white pen to add the foam to the water and sand. The sky was made using ink blending. The Christmas lights? Well, those took a little more thinking. There are no string lights in my stamp collection, sadly. So I drew a string line between the palm trees with a black felt tip pen and used a super fine brush to apply little dabs of acrylic craft paint for the bulbs.

Gosh, I love a good tropical Christmas scene!

christmas beach

Here’s a close up of the sea foam:

beach

So, there they are…all my Christmas Challenge entries! I hope that one of these will win the random drawing or the a designer spotlight! Did I tell you that I won one of the random drawings the other day? Yep. And I love me some free merch!

Y’all take care!

Leave a Comment Categories: Challenge Cards, Handcrafted Cards, Holiday Cards
Share :

“Have A Sweet Day” Slider Card

November 2, 2020 Handcrafted Cards

This interactive “Have a Sweet Day” Slider Card is an easy way to add a fun element to an already cute card.

have a sweet day slider card

Well, hi!

Welcome to my second interactive card video posted to the blog! Interestingly enough, my first interactive card video uses stamps from the same company! You can view that card video here.

I finally got my hands on the Lawn Fawn slider dies! I definitely will be using the curvy one in the future. But for now, I just used the straight die which works perfectly for this cute donut truck.

Lawn Fawn has many interactive dies from simple to complex in nature. These are the simplest and can be used with a variety of images. I chose to use an adorable food truck.

The Cruisin’ Cuisine stamp set (and coordinating die set) has been burning a hole in my stamp supplies just waiting to be used for a cute card! Remembering that I have a good friend who is a donut fanatic, I thought a donut truck card would be fitting.

I first found this stamp set through Sandy Allnock, who is an artist and paper crafter on YouTube. Amazing videos! Go check her out! Her truck is an ice cream truck and she hand draws her background with Copic markers. I opted for an easier route and used stencils, but I love how that turned out!

Watch the video to see the whole card come together, as well as find out how I covered up a mistake! I tend to make those a lot. 😉

Sunny Studios has a ton of cute stamps. You can see the blog post of the other card I made using their stamps here.

Thanks for stopping by! Leave a comment and let me know what your favorite type of food truck is.

Y’all take care!

1 Comment Categories: Handcrafted Cards
Share :

Quick & Simple Christmas Cards: Masked Trees

October 29, 2020 Handcrafted Cards, Holiday Cards

This quick and simple Christmas card technique of masked trees might be just the ticket for your holiday cards this year!

quick simple christmas cards masked trees

Well, hi!

Welcome back to the blog, and welcome to an idea that has literally been years in the making.

Okay, maybe that’s too dramatic. But I really have been itching to try this technique. Well, my version of it anyway.

The Idea

I saw someone on social media mask off some watercolor paper in a triangle tree shape and make cool droplets of color inside the mask. Once the water/paint droplets had dried, there was this cool effect! I figured I’d try it with stamping.

When I started to look through my stamps I realized that the stamp I was envisioning was not in my possession. Dang it! Oh well, regroup and recalculate.

What I Ended Up Doing Instead

What I ended up on turned out great! I used ink blending and a single, repeated stamp with tone on tone colors. The idea and technique is so simple I figured why not try it with more than one color scheme.

Once I chose the tone on tone color, I knew I wanted to keep the rest of it simple too. There are only three stamps total used. One sentiment, one tree topper bow, and the border stamp that gets repeated on the tree.

These cards went together so fast I’m actually rethinking my original 2020 Christmas card design idea.

Watch for yourself in the video below. Leave a comment and let me know which color scheme you like best. Personally, I was surprised by my preferences!

If simple is not your style, check out a more detailed Christmas card here.

Y’all take care!

Leave a Comment Categories: Handcrafted Cards, Holiday Cards
Share :

Get My Latest Posts via Email!

Name

Email


designer spotlight
SSS Monday Challenge Winner

Recent Posts

  • Cards for Ukraine
  • Simple One-Layer Cards
  • Using Airtable to Inventory Your Stamps
  • Catching Up
  • “Beautiful Blossoms” Challenge

Categories

follow me on instagram

Follow on Instagram

Archives

  • March 2022
  • February 2022
  • May 2021
  • March 2021
  • February 2021
  • January 2021
  • December 2020
  • November 2020
  • October 2020

Meta

  • Log in
  • Entries feed
  • Comments feed
  • WordPress.org
Cricketleg Creative. All Rights Reserved.Design by SkyandStars.co
Back Top

Copyright © 2023 · LoveYourself on Genesis Framework · WordPress · Log in