• Home
  • Handcrafted Cards
    • Challenge Cards
    • Quick Tips
  • About Me
  • Shop
  • More Creative Stuff
    • 3D Printing
    • Home Decor
    • Model Railroading
    • Preparedness
    • Sims 4 Builds
  • Recognition

Cricketleg Creative

  • Cards for Ukraine

    Cards for Ukraine–a movement in the papercrafting world to show support for the Ukraine. As we watch the horror that is happening in the Ukraine, we all feel heartbroken. And helpless to change anything. Many in the cardmaking world have spoken of Ukrainian cardmaking friends who are either in Ukraine or have family there. Personally,… read more

    Cards for Ukraine
  • Simple One-Layer Cards

    You can make really sweet and simple one-layer cards with very few stamps. I love a really juicy intricate card. They usually take a while, but when you look at the final product you’re super satisfied with the results. Here’s the thing though….you can actually make a beautiful, sweet card with a simple design. It… read more

    Simple One-Layer Cards
  • Using Airtable to Inventory Your Stamps

    Using AirTable can help you keep track and inventory all your stamps, dies, stencils, and more! And I have a BONUS idea at the end. Hey there! It’s been a hot minute since I’ve blogged. Where’ve I been? I took some time off (from blogging, not paper crafting) to rest, think, improve my skills, etc.… read more

    Using Airtable to Inventory Your Stamps
  • Catching Up

    After a break, I’m catching up on family event cards this week! Well, hi! Unfortunately, it’s been about a month and a half since I’ve posted to the blog. Wow, had no idea it was that long! I’ve been busy. Jumping rope, going on an amazing anniversary trip (30 years, woohoo!), starting a new business,… read more

    Catching Up
  • “Beautiful Blossoms” Challenge

    Look what’s blooming in the latest Simon Says Stamp challenge with “Beautiful Blossoms”! Well, hi! Spring is just around the corner (thank, goodness) so I’m grateful for some bright, floral fun with this “Beautiful Blossoms” card challenge. I used some new and some old to make three very different cards to enter the challenge. Let’s… read more

    “Beautiful Blossoms” Challenge

“Movie Inspiration” Challenge

October 30, 2020 Challenge Cards, Handcrafted Cards

The Simon Says Stamp Monday challenge that almost didn’t happen. I didn’t think I could make “Movie Inspiration” work….

movie inspiration challenge

Well, hi!

Each Monday and Wednesday I eagerly check the Simon Says Stamp blogs to see what our newest challenge will be, and then hunker down to plan. In fact, planning/executing/shooting/blogging for these challenges are automatically built into my planner each week.

This week, however, the “Movie Inspiration” challenge them didn’t, well, inspire me.

I mean, sure, it sounded fun. But I immediately assumed that I wouldn’t have any suitable stamps to create for this challenge. Because I use these challenges as fodder for blog posts, I was naturally disappointed. “Guess I won’t have a blog post for this one,” I lamented.

Then one night, as I was finishing up all my tasks from my planner, I noticed I just had one more: plan SSSMC projects for this week.

I was so tired and wanted to just stop. But I’ve been trying hard lately to really honor commitments to myself! So I figured, hey, I can just look around my stamps and see if anything happens.

Wow!

So many ideas came to me! I quickly wrote them down and went to bed. As I lay there trying unsuccessfully to fall asleep, each card planned itself in detail in my mind and I found myself feeling impatient for morning to come so I could make them!

What I’ve realized is that, while I do enjoy challenges that are more in my wheelhouse, the challenges that are really satisfying are the ones that really challenge my creativity! Coming up with something original and then bringing it to pass? So fulfilling!

So here they are. My Movie Inspiration Challenge entries….I love them all, but I’ll list them in order from least to most favorite.
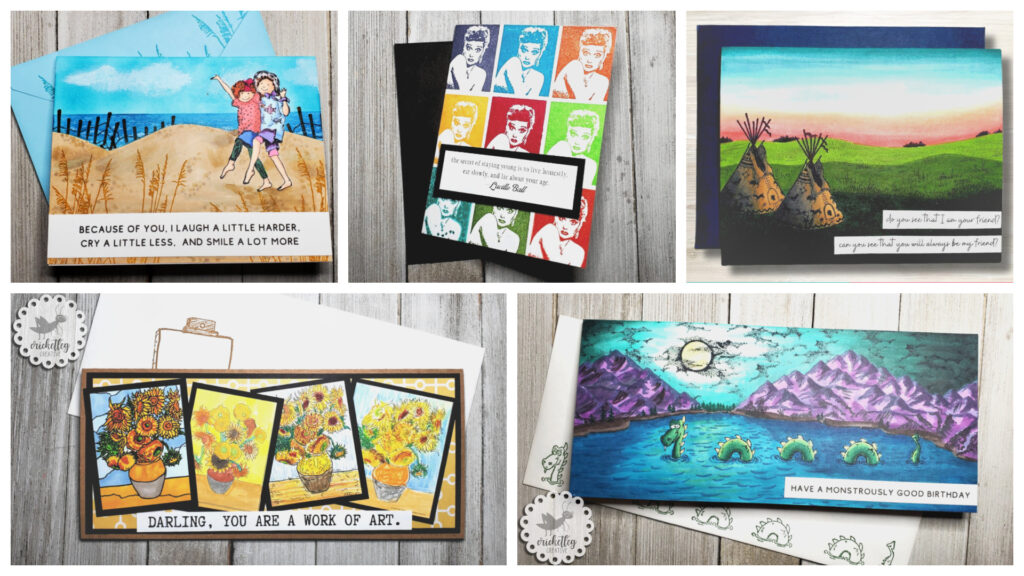
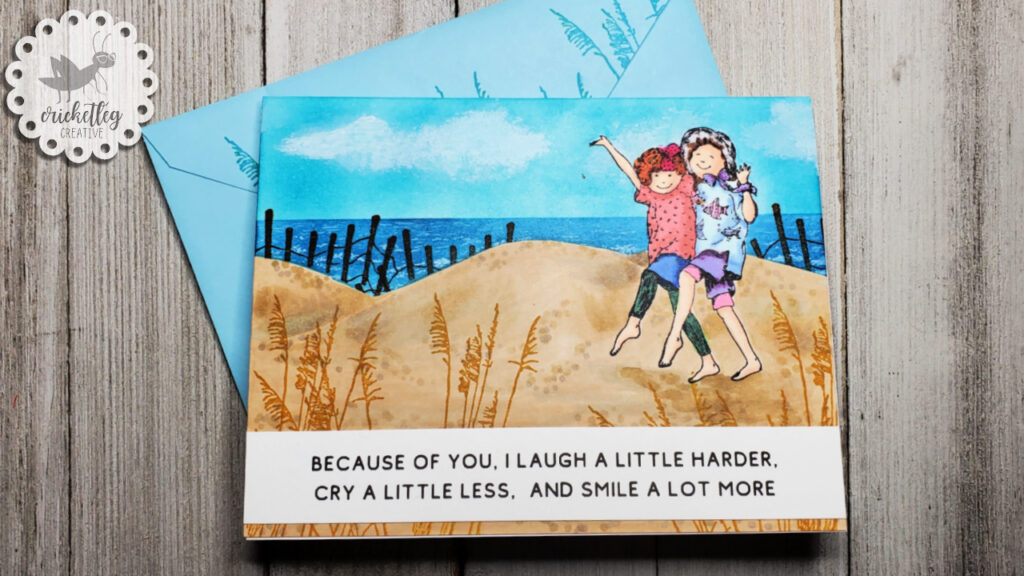
Movie: Beaches

It’s been a long time since I’ve seen the movie, Beaches. But I remember vividly the strong friendship between the main characters. I loved the parts that showed them in their youth.

And this stamp from Delafield Stamp Company (no longer in business) reminded me so much of those two young girls at the beach. I’ve had this stamp for almost 30 years. Wait, what? Sigh. Yes, it’s been that long.

I stamped them first, masked them, and used ink blending tools to create the sand dunes, sea, and sky. A Printworks sand fence stamp and Happy Stamper sea oats stamp complete the scene. (I think both of those companies are also not in business anymore.)

I colored the girls with my Ohuhu markers, which I also used to add some shading to the sand. A white gel pen was used to make the waves.

The quote is just a quote on friendship that I thought fit the mood. This was printed out from my computer using Canva.

movie inspiration challenge

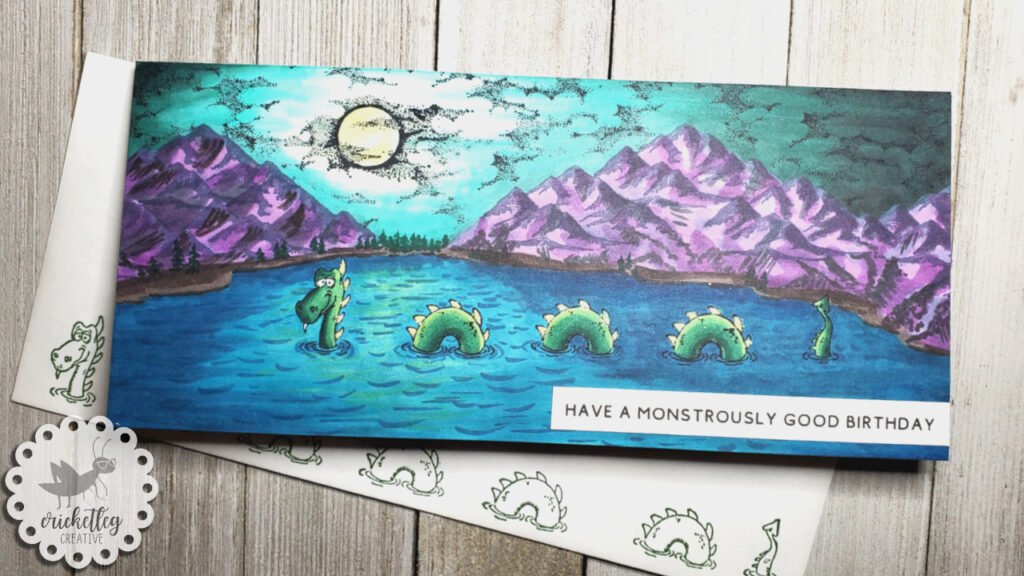
Movie: The Water Horse

I admit for this one that I’ve only seen that movie once. But I’ve had this InkaDinkaDoo stamp trio of the Loch Ness Monster for…..okay, can I just say a long time and not say the years? It’s a little depressing. 😉

Anyway, my point is that I don’t know that I have ever used these stamps and I really wanted to. The three stamps are head, hump, and tail. I stamped the hump multiple times to make her longer.

So I figured I’d make a night scene with my monster gliding along peacefully. I used some moon/cloud stamps from an old Stampin’ Up! Halloween set (that I also used in one of the entries here). Everything else is Ohuhu markers.

Unfortunately, you can’t see the glitter on all Nessie’s spikes, but it’s there!

The sentiment was printed off from my computer using Canva.

movie inspiration challenge

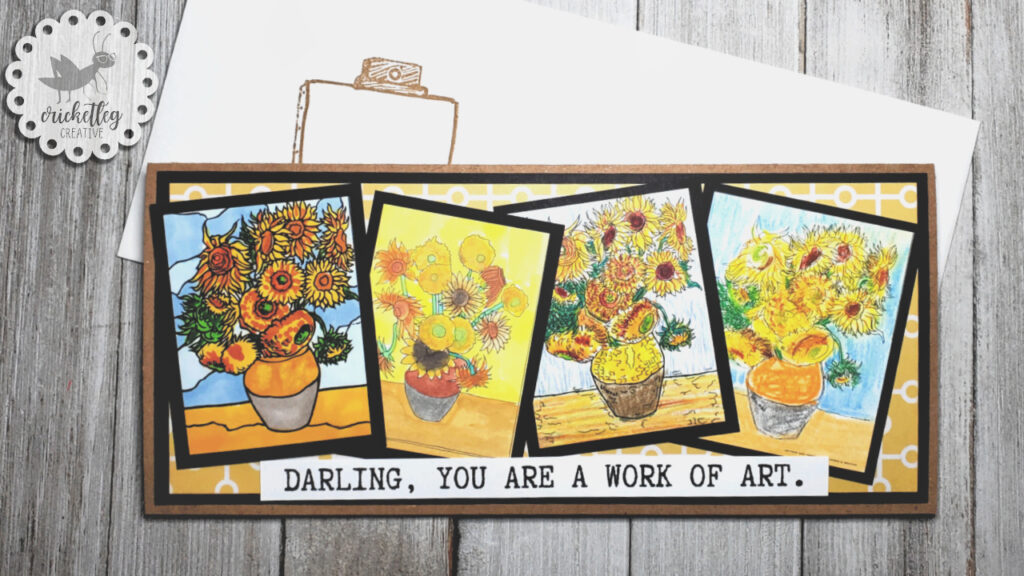
Movie: Mona Lisa Smile

Interestingly, the stamp that inspired this movie choice only got a cameo role in my next card. From Posh Impressions (also out of business….sheesh!…I’m showing my age here) the blank easel stamp sparked an idea in my head.

“Artwork…what movie was it where they all painted a picture based on the same famous work….Mona Lisa Smile!”

Yes, so I found some children’s coloring pages online of one of Vincent Van Gogh’s Sunflowers paintings. I shrunk them down and printed them off onto cardstock, much like you would for a digital stamp.

I chose four images that were each a unique interpretation of the original. Then I chose four media to use, one on each: markers, watercolor, colored pencil, chalks.

Though the sentiment is not a movie quote, I think it fits nicely. Printed from my computer using Canva.

movie inspiration challenge

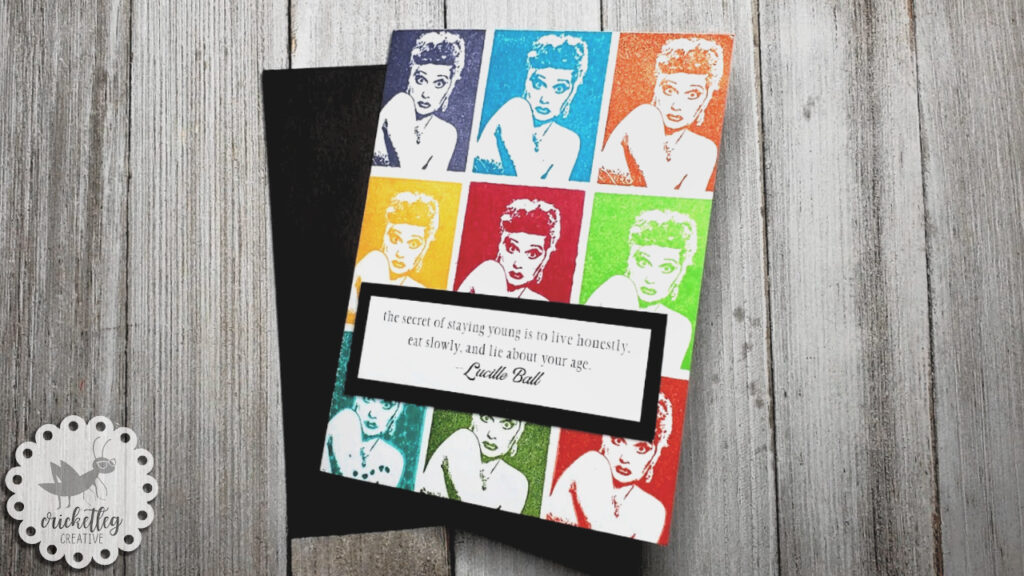
Movie (star): Lucille Ball

No, I did not pick and actual movie for this one. But I have a couple of Lucy stamps and I never use them! (My other one is from “The Chocolate Factory” episode of I Love Lucy….love that show!)

But hey, Lucille Ball was a MOVIE star, so that counts right?

(correct answer = yes)

I wanted to use one stamp, lots of bright color, and a quote from the lady herself!

I think it turned out fun. AND it’s a quick card to make.

lucille ball
lucy

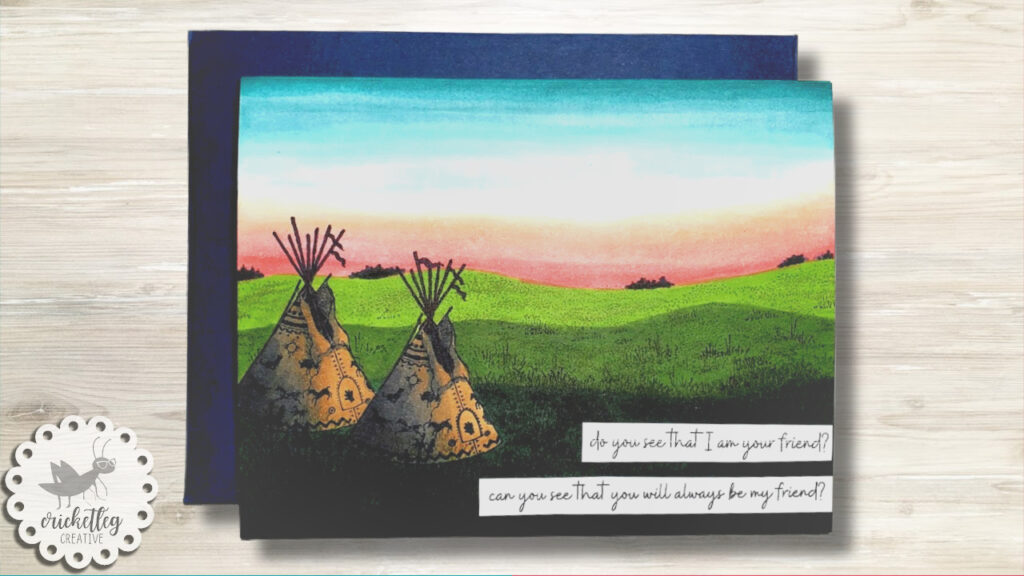
Movie: Dances With Wolves

Yes, my favorite entry, finally!!

It wasn’t my favorite idea. I had a teepee stamp from PSX (guess what? out of business) and really wanted a way to use it.

Side Note: why do I have so many stamps I’ve never used that are kind of random? Whenever we’d go to visit my husband’s family in California I would always head to the rubber stamp stores in the area. It was option overwhelm and I would just pick stamps I thought looked cool. I got home, though, and could never figure out how to make them work!

I do love the movie, Dances With Wolves, though. My husband and I saw it as newlyweds. Great times!

I stamped the teepee, masked it, and stamped again. The rest of the card is all marker, except for some grass texture stamps.

My favorite part of the card is the sky. I googled different sunset pictures to find the one I wanted. And then I did my best to pick the right colors. The blend is so much prettier in person.

As soon as I picked this movie for one of my entries, I knew exactly what the sentiment would be. That line, spoken by the character Wind in His Hair, always gives me chills and makes my eyes get all prickly with tears. Printed off from my computer using Canva!

dances with wolves
dances wit

Okay, folks. That’s another Simon Says Stamp Monday Challenge in the books! So curious to me that it went from being my least favorite theme to my absolute favorite so far. It really sparked my creativity!

See you next time. Y’all take care!

2 Comments Categories: Challenge Cards, Handcrafted Cards
Share :

Quick & Simple Christmas Cards: Masked Trees

October 29, 2020 Handcrafted Cards, Holiday Cards

This quick and simple Christmas card technique of masked trees might be just the ticket for your holiday cards this year!

quick simple christmas cards masked trees

Well, hi!

Welcome back to the blog, and welcome to an idea that has literally been years in the making.

Okay, maybe that’s too dramatic. But I really have been itching to try this technique. Well, my version of it anyway.

The Idea

I saw someone on social media mask off some watercolor paper in a triangle tree shape and make cool droplets of color inside the mask. Once the water/paint droplets had dried, there was this cool effect! I figured I’d try it with stamping.

When I started to look through my stamps I realized that the stamp I was envisioning was not in my possession. Dang it! Oh well, regroup and recalculate.

What I Ended Up Doing Instead

What I ended up on turned out great! I used ink blending and a single, repeated stamp with tone on tone colors. The idea and technique is so simple I figured why not try it with more than one color scheme.

Once I chose the tone on tone color, I knew I wanted to keep the rest of it simple too. There are only three stamps total used. One sentiment, one tree topper bow, and the border stamp that gets repeated on the tree.

These cards went together so fast I’m actually rethinking my original 2020 Christmas card design idea.

Watch for yourself in the video below. Leave a comment and let me know which color scheme you like best. Personally, I was surprised by my preferences!

If simple is not your style, check out a more detailed Christmas card here.

Y’all take care!

Leave a Comment Categories: Handcrafted Cards, Holiday Cards
Share :

“Layer It Up” Challenge

October 27, 2020 Challenge Cards, Handcrafted Cards

My examples for the Simon Says Stamp Layer It Up Challenge

simon says stamp later it up challenge

Well, hi!

Each week for the Simon Says Stamp Monday and Wednesday Challenges, five projects can be entered. This week I’m recovering from sickness so I was thinking that I wouldn’t have five completely different projects. I ended up having exactly 7 different cards! I guess I’ll have to pick my favorite five!

No stamping in these! (Well, unless you count the stamping on the birthday card envelope flaps and the digital stamp in the baby card.) Just die cuts and paper.

Big Hit Birthday

My first example is a card design I woke up thinking about. Actually, I woke up thinking about the stamp set, which I proceeded not to use for the card design.

I die cut circles for the records and the labels and used a tiny hole punch for the center hole. Before attaching the record labels, I inked up the black circle records with Versamark ink. After applying clear embossing powder I heated each record until the powder melted. Voila! Shiny record!

After adding patterned paper and a sentiment I created on the computer, my unique birthday card is done! These are currently available in my Etsy shop.

simon says stamp wednesday challenge layer it up

Front Door Welcome

Recently, very recently, I saw Spellbinders Instagram post on their October Large Die of the Month. Yeah, I was spellbound…so good company name! I signed up right away for their Die Hard kit (both the large and small die of the month). So glad I did because that kit sold out only a couple of days later! (You can see all their monthly kits here.)

It took a little figurin’ to get this project going, but once I understood how all the pieces worked together it was a breeze! So satisfying to go from little pieces to completed work!

Seemed like a good idea to work on a few different color combos just to get the creative juices flowing. I really do like each one. The blue door is sweet with it’s vellum floral window and soft autumn colors. The red door is striking with its brass mail slot and Christmas card. And the black door is elegant with its vellum stained glass window. Such fun!

These are also currently available in my Etsy shop.

simon says stamp wednesday challenge layer it up

Welcome Baby Twins

My niece asked if I could make a card for her friend who just had twin girls, and if I could customize it with their names. I thought this project was an excellent candidate for digital stamping!

I have been playing around with digital stamping a bit over the last couple of weeks. Digital stamping is basically line drawing clip art. All you do is download it, arrange it in a program like Word or Photoshop OR use it in an online design tool like Canva or Picmonkey. Save it, print it out onto cardstock and then move forward as if you had stamped it by hand…color it in, add embellishments, etc.

Because I want to put cards in my Etsy shop, I always make sure to order from sellers who allow limited commercial use of their images. So far my favorite Etsy shop for digital stamps is Lily of the Valley.

I created my card design on Canva. I placed the twins image that I had already downloaded on my computer, then added the “Welcome” and the names of the twins. Print, color, and layer onto a card. I think that this might be a nice new feature to offer in my shop! Custom cards with the baby names!

simon says stamp wednesday challenge layer it up

Stripy Birthday

I really needed to add some birthday cards to my Etsy inventory. Admittedly I am mostly smitten with Christmas/winter cards right now. but I forced myself to work on something different!

Since I’ve been wanting to try using scrap paper to make backgrounds I thought making a stripy background for a die cut birthday sentiment would be just right. I covered my card front with adhesive and then just added random strips of colored paper to create my own custom background paper.

I also decided to use the letter die cuts in two ways. One with the traditional cut out letters. But I made sure to line them up well so that I could use the negative space to create a block sentiment where the empty space shows through to the paper strip background underneath. You have to be careful and keep all the little bits so that you can add those back in later, but it’s a great way to get double duty for your die cutting.

simon says stamp layer it up challenge

So those are my entries from the Simon Says Stamp Wednesday Challenge “Layer It Up.” Cross your fingers that I get the $25 gift card in the random drawing!

You can see my most recent challenge blog post here.

Y’all take care!

Leave a Comment Categories: Challenge Cards, Handcrafted Cards
Share :

Winter Camper Slimline Card

October 26, 2020 Handcrafted Cards, Holiday Cards

This Winter Camper Slimline Card will make you a happy camper!

winter camper slimline card

Well, hi!

I’ve only recently begun experimenting with slimline cards. If you don’t know what slimline cards are, they are simply cards that will fit into a legal size envelope. That’s the basic shape.

You can make them horizontal/landscape orientation, like the one above. Or you can make a really tall card by orienting it vertically/portrait.

One of the things I love about slimline cards is the freedom it can give you! I have alphabet dies, for example, that I love but I can only fit four letters across a landscape A2 sized card. With a slimline card, I have a lot more word options.

With my Winter Camper Slimline Card, I had the space to make a nice, wide scene. No crowding the images! Had I done an A2 sized card, I likely would have left out the snowman entirely. I really wanted space in this snow scene.

My experiment with making glowing Christmas lights worked out pretty well, I think. They look glow-y to me anyway!

Although I could stand to do more in the way of shadow and light, I’m learning! And the practicing has been really fun. You can see some earlier examples of me working on night skies here and here.

So check out the whole video below! I hope you enjoy it!

Y’all take care!

4 Comments Categories: Handcrafted Cards, Holiday Cards
Share :

“Not a Card” Challenge

October 23, 2020 Challenge Cards, Handcrafted Cards, Uncategorized

My examples for the Simon Says Stamp Not a Card Challenge

simon says stamp challenge

This week’s Simon Says Stamp Monday Challenge is “Not a Card.”

I have to admit that I was not excited about this one because I’m super focused right now on making lots of CARDS for my Etsy shop! So “wasting” time on something not card-related seemed like a bother.

But I actually had a lot of fun working on these projects.

Candy Bag Topper

Having recently cleaned out my candy, cookie, and cake stuff I knew I had some treat bags waiting to be used. Halloween candy seemed the perfect match for these, and timely.

I grabbed a notecard just a little wider than the bag and folded it in half. I stamped the front of the card with an old stamp set from Stampin’ Up! And I mean from back in the 90s!! It’s always been a fun set to use.

I filled the bag, placed the card over top, and stapled it in place. Easy!

simon says stamp challenge

Recipes

Okay, technically this is a card…but it’s not a greeting card so I say it counts!

Another oldie but goodie from back in my Stampin’ Up! demo days, this recipe card stamp is pretty cute and came with all the basic recipe category stamps too.

I stamped the main card stamp onto cream cardstock. Then I used the Main Dish stamp in the bottom right corner. I just did some simple colored pencil work….it’s too detailed to do much more.

This is a great idea for when you need to take a meal to someone. Why not share the recipe, if it’s one of your best? And doing it with stamps is more fun!

simon says stamp challenge

Planner Embellishment

I love, love, love my planner. Took me years to find one that works for me.

I thought it might be fun to embellish it a little. Not necessarily to make it pretty because I have come to be a firm believer in kind of a messy planner. Or should I say well-filled?

I just wanted to add a little visual to my upcoming week.

So for a youth campfire I added a flame stamp. For my daughter’s bone marrow donation day I added a gift stamp (what a gift she is giving! so proud of her!). For family game night, I added a confetti stamp in multiple colors. And for my day to work on Christmas cards, I stamped a little tree.

I actually think I may do this on a regular basis. Because I block my time off with highlighters and have some repetitive items, sometimes I forget which week I’m on. Having a visual reminder–“oh yeah, this is the week with the campfire night”–will be helpful for my brain!

simon says stamp challenge

Gift Tags

Can I make a confession here? I don’t do gift tags.

Why? Well we have this fun tradition I started a few years ago where I don’t label the gifts to the kids. I pick a different paper to represent each person each year and my kids have to figure out who is who! It’s really fun. One year I even decoy wrapped everything–I wrapped it once in the correct paper for that person, and then again in a “decoy” wrap to confuse them.

Yes, I am looney.

But really, they were getting too good at guessing based on what people had on their lists. I add extra padding, coins, etc., to throw them off base.

Anyway, I digress.

Even though these tags will not be used for the family gifts, I will have fun using these for gifts to friends. Die cuts used for some, stamps for others.

simon says stamp challenge

Christmas Card Log Book

And now to my favorite result of this challenge!

I’ve had this Christmas Card Log book for YEARS!!! I think I got it free. I know I’ve always hated the cover. Just not my style at all.

It happened to be sitting out on my stamp desk, and I thought, “Hmmm…can I make it cute?”

Answer: Yes. Yes, I can.

Many of the stamps I own I have had since the early 90s. I remember thinking when I saw the stamp of a blank card, “Oh, that’ll be fun to use!”

Yeah. I never used it.

But now I have! I really enjoyed just making this up as I went along. I made lots of little Christmas cards to adorn this new log book. Then I masked them off with Post-Its and did some ink blending around them. That really made them pop!

Now I’m excited to mark off who I’ve sent cards to and who have sent cards!

simon says stamp challenge

So there you have it. All five of my entries into this week’s challenge. And I have to say, these ideas were fun and pretty fast! While I enjoy making a beautiful card to send, it can take a while. It was fun to make some things that were quick!

Check out the last Simon Says Stamp challenge I did.

Leave a Comment Categories: Challenge Cards, Handcrafted Cards, Uncategorized
Share :

Quick Tip: Dividing a Circle Into Thirds

October 23, 2020 Quick Tips

Learn a quick and easy tip for dividing a circle into thirds!

While making a recent card, I needed a quick way to divide a paper circle into thirds. The stamps I was using were a little too large for spaces that quartering the circle would create. So I quickly headed to the Googles (my second brain) for help.

So glad I found this tip! It’s super easy to do and you’ll likely remember it without needing to refer to the video again.

In case you are not a video/visual learner, I’ll list the steps below. It’s not complicated so don’t be put off by the number of items listed. I just like to have one step at a time to refer to, so I’m listing it that way.

  • cut a circle to whatever size you need
  • cut a second circle out of scrap paper (because you’ll be folding and marking it)
  • match the edges and fold in half
  • match those fold lines up and fold in half in the opposite direction (you’ll end up with “plus” lines for your folds)
  • mark the center, where the fold lines intersect
  • mark the center bottom (this is easy as it is on a fold line)
  • now, take half of your circle diameter and use a ruler to measure out from the bottom center mark (just pivot your ruler from that bottom mark and wherever your half-diameter measure hits the edge of the circle, that’s where you mark it)
  • do this on both sides
  • now, draw three lines….one from top center to middle, one from side mark to middle, and one from the other side mark to middle (you basically just drew a Mercedes logo)

That’s it! Now you know how to quickly and easily divide a circle into thirds. You can watch the full video of the card I made using this little tip here.

Leave a Comment Categories: Quick Tips
Share :

Matching Card & Envelope Challenge

October 21, 2020 Challenge Cards, Handcrafted Cards

My examples for the Simon Says Stamp Matching Card & Envelope Challenge

challenge cards collage

Well, hi!

Simon Says Stamp runs two weekly challenges. One is on Monday. The other on Wednesday. I’m going to try to make examples for those and post them here on the blog. You can link up to five entries for each challenge, and I think that’s a great way to get creative and have some fun! Plus, winning a $25 gift card is a pretty sweet incentive.

Last Wednesday’s challenge was to make cards with matching envelopes! Since I needed to add some inventory to my Etsy shop anyway, I figured this fit my needs pretty well!

My recent post on the We Go Together Wheel Card qualifies for the challenge as well. You can go read about it here. Shoot, I guess that makes six cards! Someone is gonna get left out! Oh well.

All these cards, minus the We Go Together card and the Bunny Love card, are currently in my Etsy shop!

Bunny Love

The first card to show you is a simple one that uses some…well…some cheap stamps I found on Amazon (see note below). The bunnies are a cute little grouping and I love doing simple shading above and below just to give a hint of a scene. A coordinating bunny stamped on the envelope flap completes the challenge! The inside sentiment says, “Somebunny loves you.”

(Side note: I don’t recommend the off-brand photopolymer stamps and dies on Amazon because they are not great quality. It was an experiment purchasing a few sets…an experiment I won’t repeat. I can use these stamps, but they have ZERO stick, so they won’t stick on their own to a block or stamp tool. The dies are not super accurate either.)

Bunny Love

Typewriter Hi

The second card to share with you is this simple but very clean Typewriter “Hi” card. I worried when coloring this image that it would be boring, but I have to say that I love the open white space around the typewriter. And the way the black cardstock behind it sets it off against the patterned letter paper. The stamps are from Stampin’ Up!…all from the same set.

It makes a nice, clean lines card.

Floral Quote

Next I’ll share this more inspirational card. One of my sisters recently requested that I stock my Etsy shop with some cards she could send people at church. So I thought I’d take a spin in that direction.

To make this encouragement quote card, I used a very intricate die from Tim Holtz. It was a bit time-consuming to punch out all the negative space, and a challenge to glue down. But I really like the effect of the white on blue cardstock. I die cut some leaves and used sponge daubers to add some shading with a dark green ink pad. The quote is just printed onto cardstock from my computer.

I used the green cardstock that I die cut the leaves from as a stencil for making the coordinating envelope back. I used the sponge dauber and that same dark green ink pad to lightly swirl over the stencil.

I’m looking forward to making more of these, incorporating quotes from spiritual leaders as well as scriptures.

Santa and Reindeer

I saved my favorite two for last. I love the bright sky behind this Santa and reindeer card. I’ve really been enjoying using my alcohol markers to work with blending color. While I’m still learning, I find that each time I work with the markers, I’m willing to be a little more daring and use more and more contrast. I just signed up to take the Copic Jumpstart class from Sandy Allnock’s Art Classes site, and can’t wait to level up my skills with all her amazing classes!

The stamps for this card are from Stampin’ Up!.

Polar Night

Night scenes seem to have become a favorite for me with my markers. This night time polar bear scene was fun to create. When I look at it, I totally get the cold, snowy mood going! Simple masking for the bear helped created some depth in the scene. And using a white gel pen for snow in the air and on the trees really makes the whole thing pop!

The Matching Card and Envelope Challenge was fun to do and helped me get some inventory into my shop!

Thanks for stopping by! I hope you got some card inspiration. I’d love to hear your comments on your own favorite ways to coordinate your envelopes with your cards! Or maybe you can do your own Matching Card & Envelope Challenge.

Y’all take care!

Leave a Comment Categories: Challenge Cards, Handcrafted Cards
Share :

We Go Together Wheel Card

October 15, 2020 Handcrafted Cards

We Go Together Wheel Card….a DIY interactive

We Go Together Wheel Card

Having just recently gotten back into the card game, I find myself without very many dies. Building my library slowly, sure (too slow if you ask me…too fast if you ask my husband), but I find myself with not a lot of options for interactive cards.

And that’s why I love it when card makers share their DIY ideas. So I’m sharing one of my DIY ideas here–a way to make an interactive card with no fancy dies. I mean I do use a die for the circle but technically you could just trace one and cut it out by hand!

This is a pretty easy card to work on, but I’d suggest making a couple out of your scrap cardstock…just to test the mechanism and placement of elements.

If you watch the video below, you’ll get to see how I made it. Bonus, you’ll also get to see a cool trick on dividing a paper circle into thirds! I was so psyched when I learned this. Super easy!

Enjoy!

5 Comments Categories: Handcrafted Cards
Share :

Bear Witch Project Shaker Card

October 15, 2020 Handcrafted Cards, Holiday Cards

This Bear Witch Project Shaker Card didn’t go 100% as planned, but he’s still a cute little spooky witch!

Bear Witch Project Shaker Card

It’s been a hot minute since I’ve made a shaker card. So I figured it was high time I tried one. Especially since I had the great idea to add googly eyes to the glitter and sequins!

Well, that didn’t quite work out as planned.

You see, those eyes are fairly fat. And they didn’t fit in the shaker window. Well, they fit, but they wouldn’t shake.

I could have added some more fun foam to add extra space but I was worried about the card fitting into my A2 size envelope. So I just took the eyes out. But I’ll definitely be trying the eyes again soon!! I just know it’s gonna be great!

Regardless of the best laid plans and all that, the card turned out well and I am really enjoying the stamps from this Simon Says Stamp set.

You can watch the whole process in this Bear Witch Project Shaker Card video below. I’m still getting the hang of editing and am limited to 15 minutes of upload time. So I have to cut a few steps out. But there’s enough there to give you the general idea.

I’d love a comment, either here on the blog or on YouTube under the video about what your favorite shaker elements are. I’m wondering what to buy and need some suggestions!

Check out this other cute Halloween card I made.

Leave a Comment Categories: Handcrafted Cards, Holiday Cards
Share :

Halloween Moon Witch Card

October 6, 2020 Handcrafted Cards, Holiday Cards, Uncategorized

Making a card using “Copic” markers to create a moonlit sky around this cute little Halloween witch!

Why the quotation marks?

Because I don’t actually own Copic markers (if someone would like to be my wealthy benefactor here, I’m all in). I do use alcohol-based markers but I find most people are familiar with the word “Copic” more than the phrase “alcohol-based markers.” Moreover, if you’re into the whole manifesting idea, then why not just go ahead and say the word?

COPIC. There, I said it.

My Mentors

Having been recently inspired by my never-met-mentor, Sandy Allnock, I embarked on the slightly intimidating task of creating a background using only markers.

As you’ll see from the time lapse video below, I stamped only a witch and some trees. The rest is all marker.

I have to admit that I absolutely adored using non-traditional colors for this Halloween card. It was so fun to do something different!

Oh, and my other never-met-mentor, Jennifer McGuire, gave a great idea in one of her videos recently. She has oh-so-many stamps and gadgets that I just drool over. I’ve been fairly jealous of how many sentiment stamps she has.

Having only just recently returned to the stamping scene from a long hiatus, I seem to have a lot of, well, dated stamps. I really want some of those simple yet awesome sentiments.

Yeah, so anyway, Jennifer mentioned casually that you can “just print them out on your printer” if you don’t have a sentiment you want.

DUH.

Consequently, that opened up a whole new world for me, I can tell you! So I’ve been playing with that a LOT.

Please take a look at the time lapse video below to see how my card came together. Someday the blending will be much more smooth when I have those real Copics. But for now, I can be content with what I have.

Mostly.

Leave a Comment Categories: Handcrafted Cards, Holiday Cards, Uncategorized
Share :
  • « Previous Page
  • 1
  • …
  • 3
  • 4
  • 5
  • 6
  • Next Page »

Get My Latest Posts via Email!

Name

Email


designer spotlight
SSS Monday Challenge Winner

Recent Posts

  • Cards for Ukraine
  • Simple One-Layer Cards
  • Using Airtable to Inventory Your Stamps
  • Catching Up
  • “Beautiful Blossoms” Challenge

Categories

follow me on instagram

Follow on Instagram

Archives

  • March 2022
  • February 2022
  • May 2021
  • March 2021
  • February 2021
  • January 2021
  • December 2020
  • November 2020
  • October 2020

Meta

  • Log in
  • Entries feed
  • Comments feed
  • WordPress.org
Cricketleg Creative. All Rights Reserved.Design by SkyandStars.co
Back Top

Copyright © 2023 · LoveYourself on Genesis Framework · WordPress · Log in